This FAQ is designed to answer your questions about the Experimental Enhancements introduced with MPC 3.10.1, including how to enable and use them, important considerations, and troubleshooting information.
Important Note: Beta Enhancements = The enhancements in this section are "beta" features, provided for test purposes. Enable these enhancements may take your product unstable, so please use them carefully.
Enhancements include unsupported functionalitys, such as mouse control and third-party plugins. Use of enhancements is at the user’s discretion and may impact MPC performance or stability.
TABLE OF CONTENTS
- General:
- What are Experimental Enhancements in MPC 3.10.1?
- Which MPC models support Experimental Enhancements?
- How do I enable Experimental Enhancements on MPC Live III or MPC XL?
- Can I enable or disable each Experimental Enhancement individually?
- Are Experimental Enhancements officially supported by Akai Professional?
- Can Experimental Enhancements affect MPC performance or stability?
- External Plugin Support:
- Can I install third-party plugins on my standalone MPC?
- Can I use standard Windows or macOS VST2 plugins on standalone MPC?
- Do third-party plugins need to be specifically created for MPC OS?
- Where should compatible VST2 plugins be installed on my MPC?
- What is the MPC Plugin SDK and where can I download it?
- Does Akai Professional test or support third-party plugins created using the MPC Plugin SDK?
- What should I do if a third-party plugin causes my MPC to freeze, crash, or experience audio problems?
- Unlimited Tracks and Plugin Instances:
- Mouse and Screenshots:
- Advanced Audio Settings:
- Developer Mode:
- What is Developer Mode on MPC?
- How do I enable Developer Mode?
- What can I access through the Developer Mode system shell?
- Can Developer Mode damage the MPC operating system or delete my files?
- Is it safe to enable Developer Mode while connected to a public or untrusted network?
- How do I disable the system shell and SSH server?
- What is autorun.sh and what are the risks of running an unsigned script?
- MPC Remote Screen Viewer:
- What is MPC Remote Screen Viewer?
- How do I connect my MPC to MPC Remote Screen Viewer?
- What should I do if MPC Remote Screen Viewer cannot connect to my MPC?
- How do I disable remote control while still allowing someone to view the MPC screen?
- Can MPC Remote Screen Viewer stream audio from my MPC?
- Can I take screenshots and screen recordings using MPC Remote Screen Viewer?
- What is the difference between High and Low Refresh Speed?
- Can using Remote Screen Viewer affect MPC performance or cause audio dropouts?
- Is the Remote Screen connection encrypted?
- Can other people on my network connect to my MPC if they know the Remote Screen password?
- How do I change or reset my Remote Screen password?
- Troubleshooting:
General:
What are Experimental Enhancements in MPC 3.10.1?
- External Plugin Support
- Mouse Pointer
- Screenshots
- Unlimited Audio/Plugin Tracks
- Unlimited Plugin Instances
- Advanced Audio Settings
- Developer Panel
- Remote Screen Viewer
Which MPC models support Experimental Enhancements?
Any MPC model that supports firmware version 3.10.1, including the MPC XL, MPC Live III, MPC One G2, MPC Key 37 G2, MPC Key 61, MPC One+, MPC One, MPC Key 37, MPC X, MPC X SE, MPC Live II, and MPC Live.
How do I enable Experimental Enhancements on MPC Live III or MPC XL?
- Open Preferences by pressing Menu and tapping the Preferences icon at the bottom of the screen. (On MPC XL, you can alternatively press and hold Shift and press Menu / Prefs).
- Scroll down and select the Enhancements tab.
- Set Enable Enhancements to On.
- Once enabled, each Experimental Enhancement can be switched on or off individually.
- Tap the Info icon next to an enhancement to learn more about what that feature does.
Can I enable or disable each Experimental Enhancement individually?
Yes. Once Enable Enhancements is switched On, each Experimental Enhancement can be enabled or disabled independently from the Preferences > Enhancements menu.
You can also tap the Info icon next to each enhancement to learn more about its specific function.
Are Experimental Enhancements officially supported by Akai Professional?
Experimental Enhancements are provided for testing and exploration and may affect system performance or stability.
Some enhancements include functionality that is not officially supported, such as mouse operation and third-party plugins. Third-party plugins are not tested or supported by inMusic, and faulty or incompatible plugins may cause crashes, freezes, increased CPU usage, or audio issues.
When using Experimental Enhancements, we recommend saving your work regularly and disabling the relevant enhancement if you experience unexpected behavior.
Can Experimental Enhancements affect MPC performance or stability?
Yes. Experimental Enhancements are provided for testing and exploration and may affect the performance or stability of your MPC.
Features such as Unlimited Audio/Plugin Tracks, Unlimited Plugin Instances, External Plugin Support, and Remote Screen Viewer can increase CPU and memory usage. If the available resources of your MPC are exceeded, you may experience:
- Audio crackles or dropouts
- Slower system response
- Increased CPU or memory usage
- Freezing or crashes
We recommend saving your work regularly when using Experimental Enhancements and disabling any enhancement that appears to be causing performance or stability issues.
If you are using External Plugin Support, try removing or disabling the third-party plugin to determine whether it is causing the issue. Third-party plugins are not tested or supported by inMusic and may affect system stability.
External Plugin Support:
Can I install third-party plugins on my standalone MPC?
Yes. With External Plugin Support enabled under Experimental Enhancements, compatible third-party plugins can be loaded from the “VST2 Plugins” folder on the internal MPC drive or an attached drive.
Important: Third-party plugins are not tested or supported by inMusic. A faulty or incompatible plugin may cause audio glitches, increased processor usage, freezing, or crashes, so we recommend saving your work regularly when using this feature.
Can I use standard Windows or macOS VST2 plugins on standalone MPC?
No. Standard VST2 plugins designed for Windows or macOS cannot be used directly on standalone MPC hardware.
Plugins must be specifically created to be compatible with MPC OS. Compatible plugins can be loaded from the “VST2 Plugins” folder on the internal MPC drive or from an attached drive when External Plugin Support is enabled.
Do third-party plugins need to be specifically created for MPC OS?
Yes. Third-party plugins must be specifically created to be compatible with MPC OS.
The MPC Plugin SDK allows developers to create compatible instrument and effect plugins for standalone MPC.
Where should compatible VST2 plugins be installed on my MPC?
Compatible VST2 plugins should be placed in the “VST2 Plugins” folder on either:
- The internal MPC drive, or
- An attached storage drive
To load these plugins, External Plugin Support must be enabled under Preferences > Enhancements.
What is the MPC Plugin SDK and where can I download it?
The MPC Plugin SDK allows you to build your own instrument and effect plugins specifically for standalone MPC.
It can be paired with the AI coding platform of your choice, allowing you to turn plain-language ideas into working MPC plugins without needing to write or even read the underlying C++ code.
Important: Plugins created using the SDK are not tested or supported by inMusic and could potentially cause performance issues, audio glitches, freezing, or crashes.
You can download the MPC Plugin SKD by following this link.
Does Akai Professional test or support third-party plugins created using the MPC Plugin SDK?
No. Third-party plugins created for standalone MPC are not tested or supported by inMusic.
What should I do if a third-party plugin causes my MPC to freeze, crash, or experience audio problems?
If a third-party plugin causes your MPC to freeze, crash, or experience audio issues, we recommend removing or disabling the affected plugin and restarting your MPC.
Unlimited Tracks and Plugin Instances:
What does the Unlimited Audio/Plugin Tracks enhancement do?
The Unlimited Audio/Plugin Tracks enhancement removes the separate limits on the number of audio tracks and plugin tracks you can use in a project.
When enabled, only the overall MPC track limit of 128 tracks applies.
Important: MPC hardware is not designed to run this many audio or plugin tracks simultaneously. Using a large number of tracks can consume more processing power and memory than is available, which may result in:
- Audio dropouts
- Slower system performance
- Freezing or crashes
If a project is saved with more tracks than the standard limits, the extra tracks will be lost if the project is opened while Unlimited Audio/Plugin Tracks is switched off.
Does Unlimited Plugin Instances mean I can load an unlimited number of plugins regardless of available memory?
No. Unlimited Plugin Instances removes the usual limits on how many copies of certain synths and effects can be used, but it does not remove the MPC’s processing power or memory limitations.
Each plugin instance uses system resources. If your MPC runs out of available memory, it will not be able to load another instance, even with Unlimited Plugin Instances enabled.
What happens to a project using additional plugin instances if the enhancement is disabled?
If a project was saved using more plugins than the standard limits, the additional plugins may not load when the project is reopened with Unlimited Plugin Instances switched off.
To ensure all plugin instances load as expected, keep Unlimited Plugin Instances enabled when opening projects that rely on the additional instances.
Mouse and Screenshots:
Can I use a USB mouse to control my MPC?
Yes. When the Mouse Pointer Experimental Enhancement is enabled, you can connect a USB mouse to your MPC and use it to control the interface. A mouse pointer will appear on the MPC touchscreen.
Important: Mouse operation is not officially supported, and some parts of the MPC interface may not behave as expected when using a mouse.
If Mouse Pointer is switched off, any connected USB mouse will be ignored.
How do I take a screenshot on my MPC?
First, make sure the Screenshots Experimental Enhancement is enabled.
To capture a screenshot:
- Press the four Bank buttons (A, B, C, and D) together.
- The current touchscreen display will be saved as a PNG file, labelled with the date and time.
To choose where your screenshots are saved, hold Shift while pressing the four Bank buttons.
Advanced Audio Settings:
What settings are added when Advanced Audio Settings is enabled?
When Advanced Audio Settings is enabled, additional options are added to Preferences > Audio Device, including:
- Audio Buffer Size
- Latency Adjust
- Sample Rate (which may be fixed depending on the connected audio hardware)
What does changing the audio buffer size do?
The audio buffer size affects the delay between playing something and hearing the resulting audio.
- A smaller buffer size reduces latency, making the MPC feel more responsive.
- If the buffer size is set too low, it can cause audio crackles, dropouts, or the MPC to freeze.
For the best results, use a buffer size that provides low enough latency without causing audio or performance issues.
What does the Latency Adjust setting do?
The Latency Adjust setting shifts MIDI output and Ableton Link timing to align with the audio you hear.
If the Latency Adjust value is set incorrectly, MIDI output or Ableton Link may become out of time with the audio.
Adjust this setting carefully to ensure your external MIDI devices and Ableton Link remain correctly synchronized with your MPC’s audio output.
Developer Mode:
What is Developer Mode on MPC?
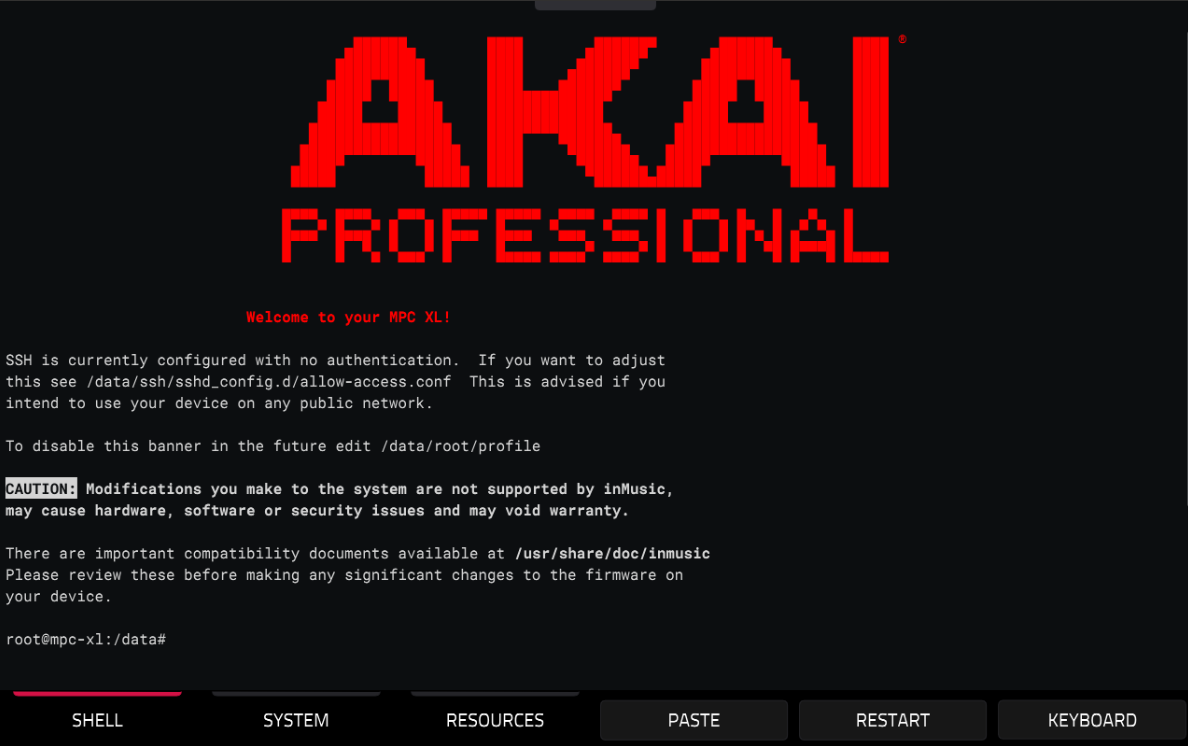
Developer Mode is an Experimental Enhancement that provides access to advanced developer utilities, including a system shell that gives full access to the MPC’s Linux system.
Developer Mode also:
- Allows advanced system-level commands and developer tools.
- Can run an unsigned autorun.sh script from an attached drive.
- Enables the MPC’s SSH server, allowing the device to be accessed over a network.
Important: Developer Mode should only be used if you know what you are doing. Commands entered through the system shell can change or delete system files, project data, and files on attached drives, and could prevent the MPC from working or starting correctly.
Enabling SSH can also create a security risk on untrusted networks.
Only use these tools if you understand the associated risks.
How do I enable Developer Mode?
First, ensure Experimental Enhancements are enabled, then enable the Developer Panel from Preferences > Enhancements.
To enter Developer Mode, you can either:
- Select Developer from the second page of the Mode Menu, or
- Press and hold Shift + Menu.
What can I access through the Developer Mode system shell?
The Developer Mode system shell provides full access to the MPC’s Linux operating system, with the same permissions as the MPC itself. This includes access to system files, project data, and the contents of any attached drives.
Because the shell has this level of access, commands can modify or delete important files and may cause the MPC to stop working correctly or prevent it from starting.
Developer Mode should only be used if you understand the commands you are running.
Can Developer Mode damage the MPC operating system or delete my files?
Yes. Developer Mode provides full access to the MPC’s Linux system, including system files, project data, and connected storage. Commands entered through the system shell can change or delete files, cause the MPC to stop working correctly, or potentially prevent it from starting.
Developer Mode should therefore only be used if you understand the commands and tools you are running. Enabling it also activates the MPC’s SSH server, so it is recommended to use this feature only on trusted networks.
Switching Developer Mode off will close the system shell and disable the SSH server.
Is it safe to enable Developer Mode while connected to a public or untrusted network?
No. Enabling Developer Mode also activates the MPC’s SSH server, allowing the device to be accessed over the network. This can expose your MPC to potential security risks when connected to a public or untrusted network.
Developer Mode should therefore only be used on networks you trust. When Developer Mode is switched off, the system shell is closed and the SSH server is disabled.
How do I disable the system shell and SSH server?
What is autorun.sh and what are the risks of running an unsigned script?
autorun.sh is a script that can be automatically run from an attached drive when Developer Mode is enabled. Developer Mode allows the MPC to offer to run an unsigned autorun.sh, meaning the script has not been verified or approved by inMusic.
Because Developer Mode provides full access to the MPC’s Linux system, an unsigned script could potentially modify or delete system files, project data, or files on attached drives, and could cause the MPC to become unstable or prevent it from starting correctly.
Only run an autorun.sh script if you fully understand its purpose and associated risks. Running the script is at your own discretion.
MPC Remote Screen Viewer:
What is MPC Remote Screen Viewer?
MPC Remote Screen Viewer allows you to view your standalone MPC’s touchscreen remotely from a computer over the same network. When remote control is enabled, you can also operate the MPC using your computer’s mouse, touchpad, or keyboard.
The Remote Screen Viewer also includes:
- Audio sharing
- Mouse control with on-screen feedback
- Device statistics
- Screenshots, automatically saved to your desktop
- Screen recording, automatically saved to your desktop
Remote Screen is an Experimental Enhancement, so using it may consume additional processing power and could affect MPC performance while the screen is actively being viewed.
How do I connect my MPC to MPC Remote Screen Viewer?
- Enable Remote Screen under Preferences > Enhancements > Remote Screen.
- Locate your MPC’s IP address. This appears in the on-screen overlay when Remote Screen is enabled, or can be found under:
- Preferences > Ethernet, or
- Preferences > Wi-Fi, then hold Shift and tap Info.
- Open MPC Remote Screen Viewer on your computer and enter the MPC’s IP address into the Host field.
- On your MPC, go to Preferences > Enhancements > Remote Screen and locate the Password field.
- Enter this password into the Password field in MPC Remote Screen Viewer to connect.
Important: Remote Screen should only be used on a trusted network. Anyone on the same network with the password may be able to view your MPC screen and, if Allow Remote Control is enabled, operate the MPC remotely.
What should I do if MPC Remote Screen Viewer cannot connect to my MPC?
If MPC Remote Screen Viewer cannot connect, check the following:
- Make sure Remote Screen is enabled under Preferences > Enhancements.
- Confirm that your MPC and computer are connected to the same network.
- Check that the correct IP address has been entered into the Host field.
- Verify that the Remote Screen password has been entered correctly.
- If necessary, switch Remote Screen off and back on again to generate a new password, then try connecting again.
- Use Remote Screen only on a trusted network.
How do I disable remote control while still allowing someone to view the MPC screen?
Go to Preferences > Enhancements > Remote Screen and switch off Allow Remote Control.
The connected user will still be able to view everything shown on the MPC touchscreen, but their mouse, touchpad, and keyboard inputs will be ignored, preventing them from controlling the MPC remotely.
Can MPC Remote Screen Viewer stream audio from my MPC?
Yes. Enable Share Audio under Preferences > Enhancements > Remote Screen to allow the MPC Remote Screen Viewer to hear your MPC’s main audio output.
Audio is only sent while audio is enabled in the application and someone is actively listening. While streaming, it uses a small amount of processing power, and the audio may arrive slightly behind what is heard directly from the MPC.
Only use this feature on a trusted network, as anyone on the same network with the Remote Screen password may be able to listen to the audio.
Can I take screenshots and screen recordings using MPC Remote Screen Viewer?
Yes. MPC Remote Screen Viewer includes built-in options for:
- Screenshots, which are automatically saved to your computer’s desktop.
- Screen recordings, which are also automatically saved to your desktop.
These features allow you to capture what is displayed on your MPC touchscreen directly through the Remote Screen Viewer application.
What is the difference between High and Low Refresh Speed?
The Refresh Speed setting determines how frequently the MPC touchscreen display is updated in MPC Remote Screen Viewer.
- High: Provides more frequent screen updates for a smoother and more responsive viewing experience.
- Low: Reduces the frequency of screen updates, which may help reduce processing and network usage.
If you experience performance issues or audio dropouts while using Remote Screen Viewer, try setting the Refresh Speed to Low.
Can using Remote Screen Viewer affect MPC performance or cause audio dropouts?
Yes. While MPC Remote Screen Viewer is actively viewing your MPC’s screen, it uses additional processing power, which can slow down the MPC or potentially cause audio dropouts.
Is the Remote Screen connection encrypted?
No. The Remote Screen picture is not encrypted, so you should only use MPC Remote Screen Viewer on a network that you trust.
Anyone on the same network who has the Remote Screen password may be able to view everything displayed on your MPC touchscreen, including project and file names. If Allow Remote Control is enabled, they may also be able to operate the MPC remotely.
For security, avoid using Remote Screen Viewer on public or untrusted networks.
Can other people on my network connect to my MPC if they know the Remote Screen password?
How do I change or reset my Remote Screen password?
Go to Preferences > Enhancements > Remote Screen on your MPC.
- To change the password, select the Password field and enter a new password.
- To reset the password, switch Remote Screen off and back on again. This will automatically generate a new password.
Anyone using the previous password will need the new password to reconnect.
Troubleshooting:
What should I do if I experience issues after enabling Experimental Enhancements?
If your MPC becomes unstable, freezes, crashes, experiences audio dropouts, or behaves unexpectedly after enabling an Experimental Enhancement:
- Save your work whenever possible.
- Go to Preferences > Enhancements and disable the enhancement that may be causing the issue.
- Restart your MPC and check whether normal operation is restored.
- If you are using External Plugin Support, remove or disable any third-party plugins that may be contributing to the issue.
What should I do if I experience further issues?
If you continue to experience issues after installing MPC 3.10.1, please try rolling your MPC back to firmware version 3.10 using the steps below.
1. Download the appropriate MPC 3.10.0 updater
MPC Gen 1
MPC Gen 2
FORCE
- macOS: Force 3.10.0 Firmware Updater
- Windows: Force 3.10.0 Firmware Updater
2. Connect your MPC directly to your computer using the original USB cable supplied with the unit.
3. With the MPC powered off, press and hold the appropriate button combination below while powering on the device.
Once the unit is in update mode, run the MPC 3.10.0 updater on your computer.
| MPC | Button Combination |
|---|---|
| MPC XL / MPC Live III | BANK C + FULL LEVEL + ERASE |
| MPC Key 37 G2 | PAD BANK C + FULL LEVEL + ERASE |
| MPC One G2 | LOAD + PAD BANK C + FULL LEVEL |
| MPC One / MPC One+ | FULL LEVEL + BROWSE + PAD BANK C/G |
| MPC Key 61 / MPC Key 37 | FULL LEVEL + ERASE + PAD BANK C/G |
| MPC Live | FULL LEVEL + ERASE + PAD BANK C/G |
| MPC Live II | FULL LEVEL + ERASE + PAD BANK C/G |
| MPC X | 16 LEVEL + NEXT SEQUENCE + PAD BANK C/G |
| FORCE | MATRIX + LOAD + SAVE |
Once the rollback is complete, test the MPC again on firmware 3.10.0 to determine whether the issue is still present.
Was this article helpful?
That’s Great!
Thank you for your feedback
Sorry! We couldn't be helpful
Thank you for your feedback
Feedback sent
We appreciate your effort and will try to fix the article