One of best things about the Moog Messenger is it's incredibly flexible modulation assignment routing. Some of these may not be so obvious to locate on the hardware. Here is a list of the modulation assignments currently available on the synth & instructions on how to apply them to your patch.
TABLE OF CONTENTS
- What is a Modulation Assignment?
- How to patch a Modulation Assignment
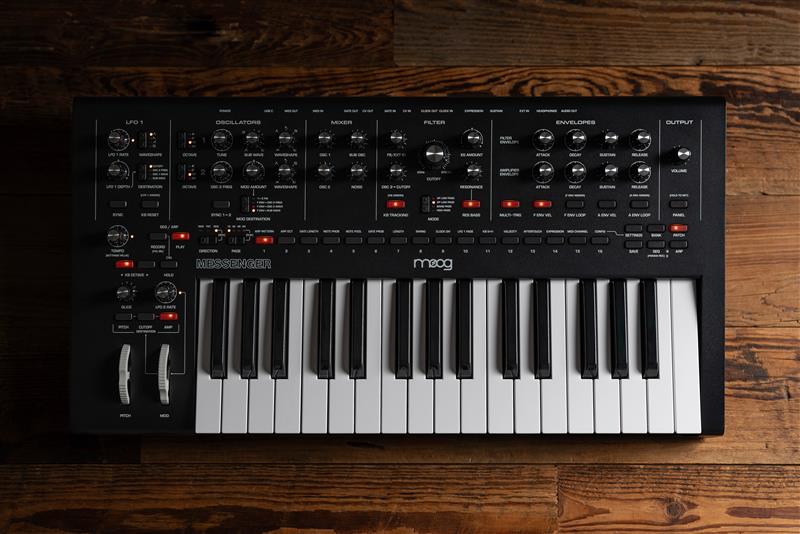
- Low Frequency Oscillator 1 (LFO 1 AMT)
- Keyboard Volt Per Octave (KB AMT)
- Filter Envelope (F ENV AMT)
- Amp Envelope (A ENV AMT)
- Modulation Wheel (MOD WHEEL AMT)
- Keyboard Sample & Hold (KB S+H AMT)
- Velocity (VEL AMT)
- Aftertouch (AT AMT)
- Expression Pedal (EXP AMT)
- Using The Editor
What is a Modulation Assignment?
Essentially, you are taking the given modulation source, and patching it to any other knob on the synth that would not usually be assigned. This is a quick and easy way to create very intricate sound designs.
Usually, you would need to patch in these changes using a CV connection. However, this is all done via the Messenger's button combinations & menu systems. There is no screen on the Messenger, so learning how to get around the synth's UI efficiently is the best way to quickly navigate these features.
Modulation destination assignments are saves on a per-patch basis.
There are no rules. Experiment & have fun!
How to patch a Modulation Assignment
One you have selected a modulation source, PGM 8 & 9 will light up. The PGM lights are now displaying the depth of modulation applied. This is a bipolar amount - meaning that it can be modulated positively (PGM 9 - 16) or negatively (PGM 1-8). You can play a note and test out the depth amount before committing to saving the assignment. After the depth has been selected, it's time to save it to the patch. To save any NON-SETTINGS MODULATORS. re-press the associated modulation source button to confirm the destination & depth. To save the SETTINGS MODULATORS, press SETTINGS to confirm your the destination & depth.

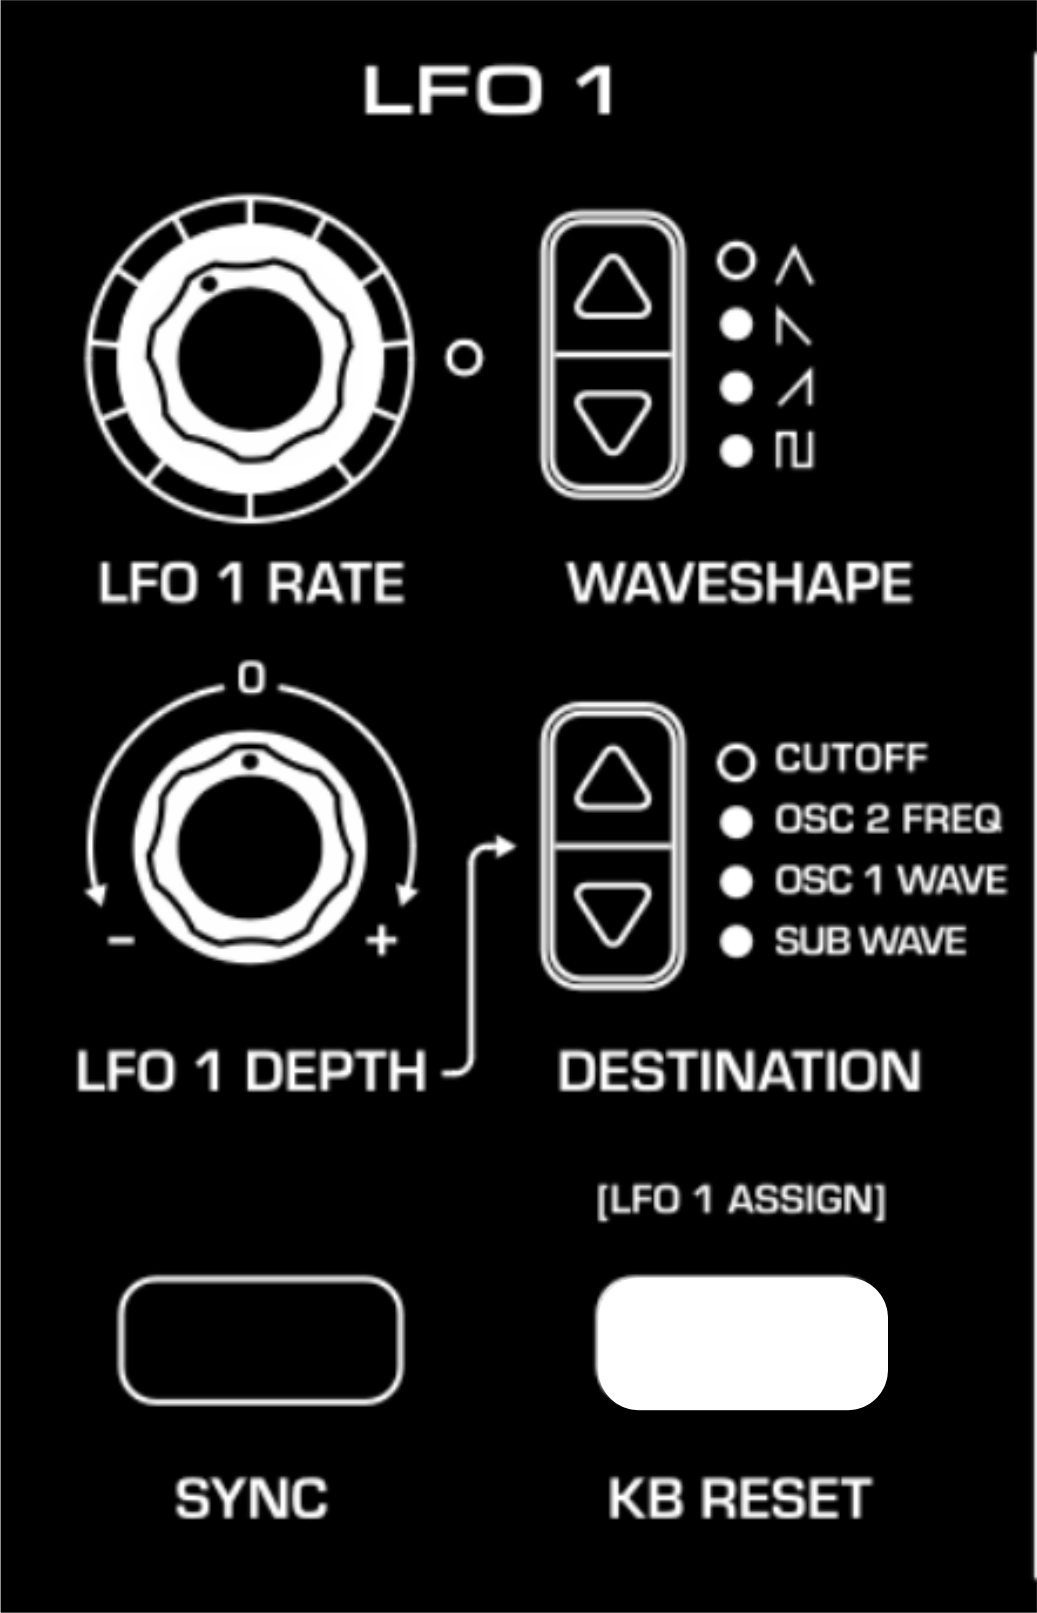
Low Frequency Oscillator 1 (LFO 1 AMT)
An LFO is a bipolar waveshape that oscillates at a frequency that is so low that it is inaudible. They are utilized for cyclical modulation of various parameters. This LFO has four selectable waveshapes and four pre-routed destinations to choose from. When an alternative destination is assigned, the previously selected destination will also be routed to this LFO. The RATE & WAVESHAPE will be shared amongst the two destinations. LFO 1 DEPTH will only control the depth of the destination that it is pointing to.
Try adding this to LFO 2 RATE to create a unique stacked waveshape for LFO 2.
- Hold KB RESET (LFO 1 ASSIGN) for 2 seconds to assign LFO 1 to another custom destination.
- Twist the knob of your chosen destination to change the depth either positively or negatively.
- Press KB RESET (LFO 1 ASSIGN) to save your settings.
- LFO 1 DEPTH will only control the depth of the assigned destination on the UI. To change the depth of the custom assignment - repeat the previous steps.
- The four hardware switchable destinations on the UI will also be modulated by LFO 1, assigning the LFO to two sources at once.
- Only one custom LFO 1 modulation routing may be programmed this way per patch.
Keyboard Volt Per Octave (KB AMT)
Enables full volt per octave control of a destination. Initially, this is routed to the CUTOFF filter, meaning notes played higher up the keyboard would have a brighter sound. You will also be able to play the resonance filter as another oscillator if it is boosted enough to self oscillate. Sending volt per octave information to another destination will allow the parameter to change in tonality dependent on the key that is pressed.
Try sending it to NOISE to make the generator brighter or darker dependent on the pitch of the note.
- Hold KB TRACKING (KB ASSIGN) for 2 seconds to assign the keyboard volt/octave pitch information to another custom destination.
- Twist the knob of your chosen destination to change the depth either positively or negatively.
- Press KB RESET (LFO ASSIGN) to save your settings.
- To change the depth of the custom assignment - repeat the previous steps.
- The KB tracking button enables full volt/octave keyboard control of the CUTOFF frequency. Assigning another destination will not stop KB tracking the filter. By assigning a custom destination, two destinations will then be routed to the KB volt/octave tracking.
- Only one custom KB modulation routing may be programmed this way per patch.
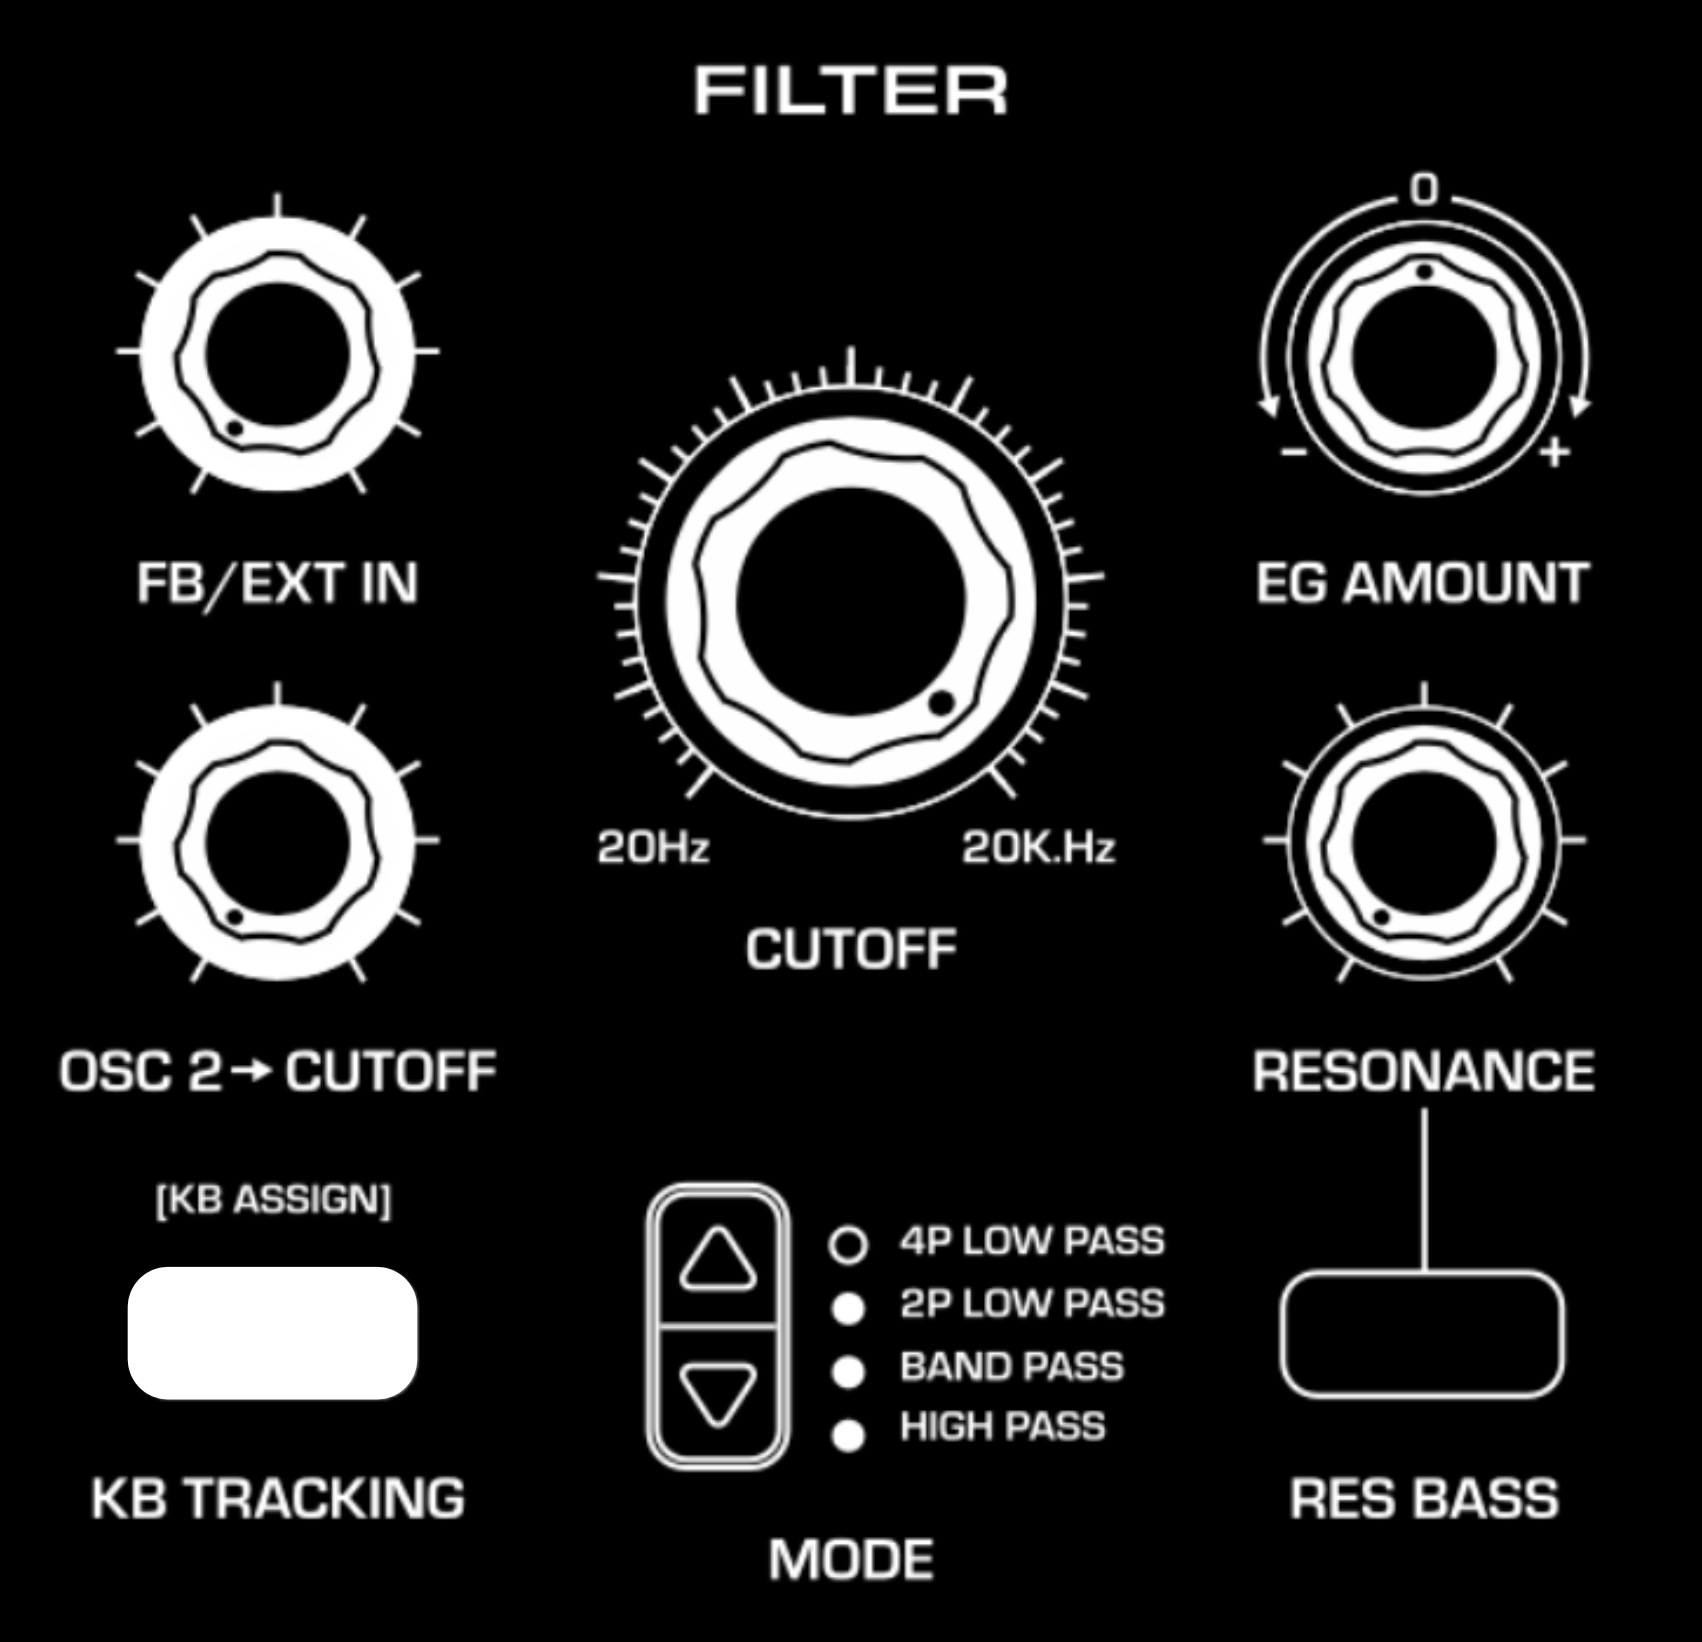
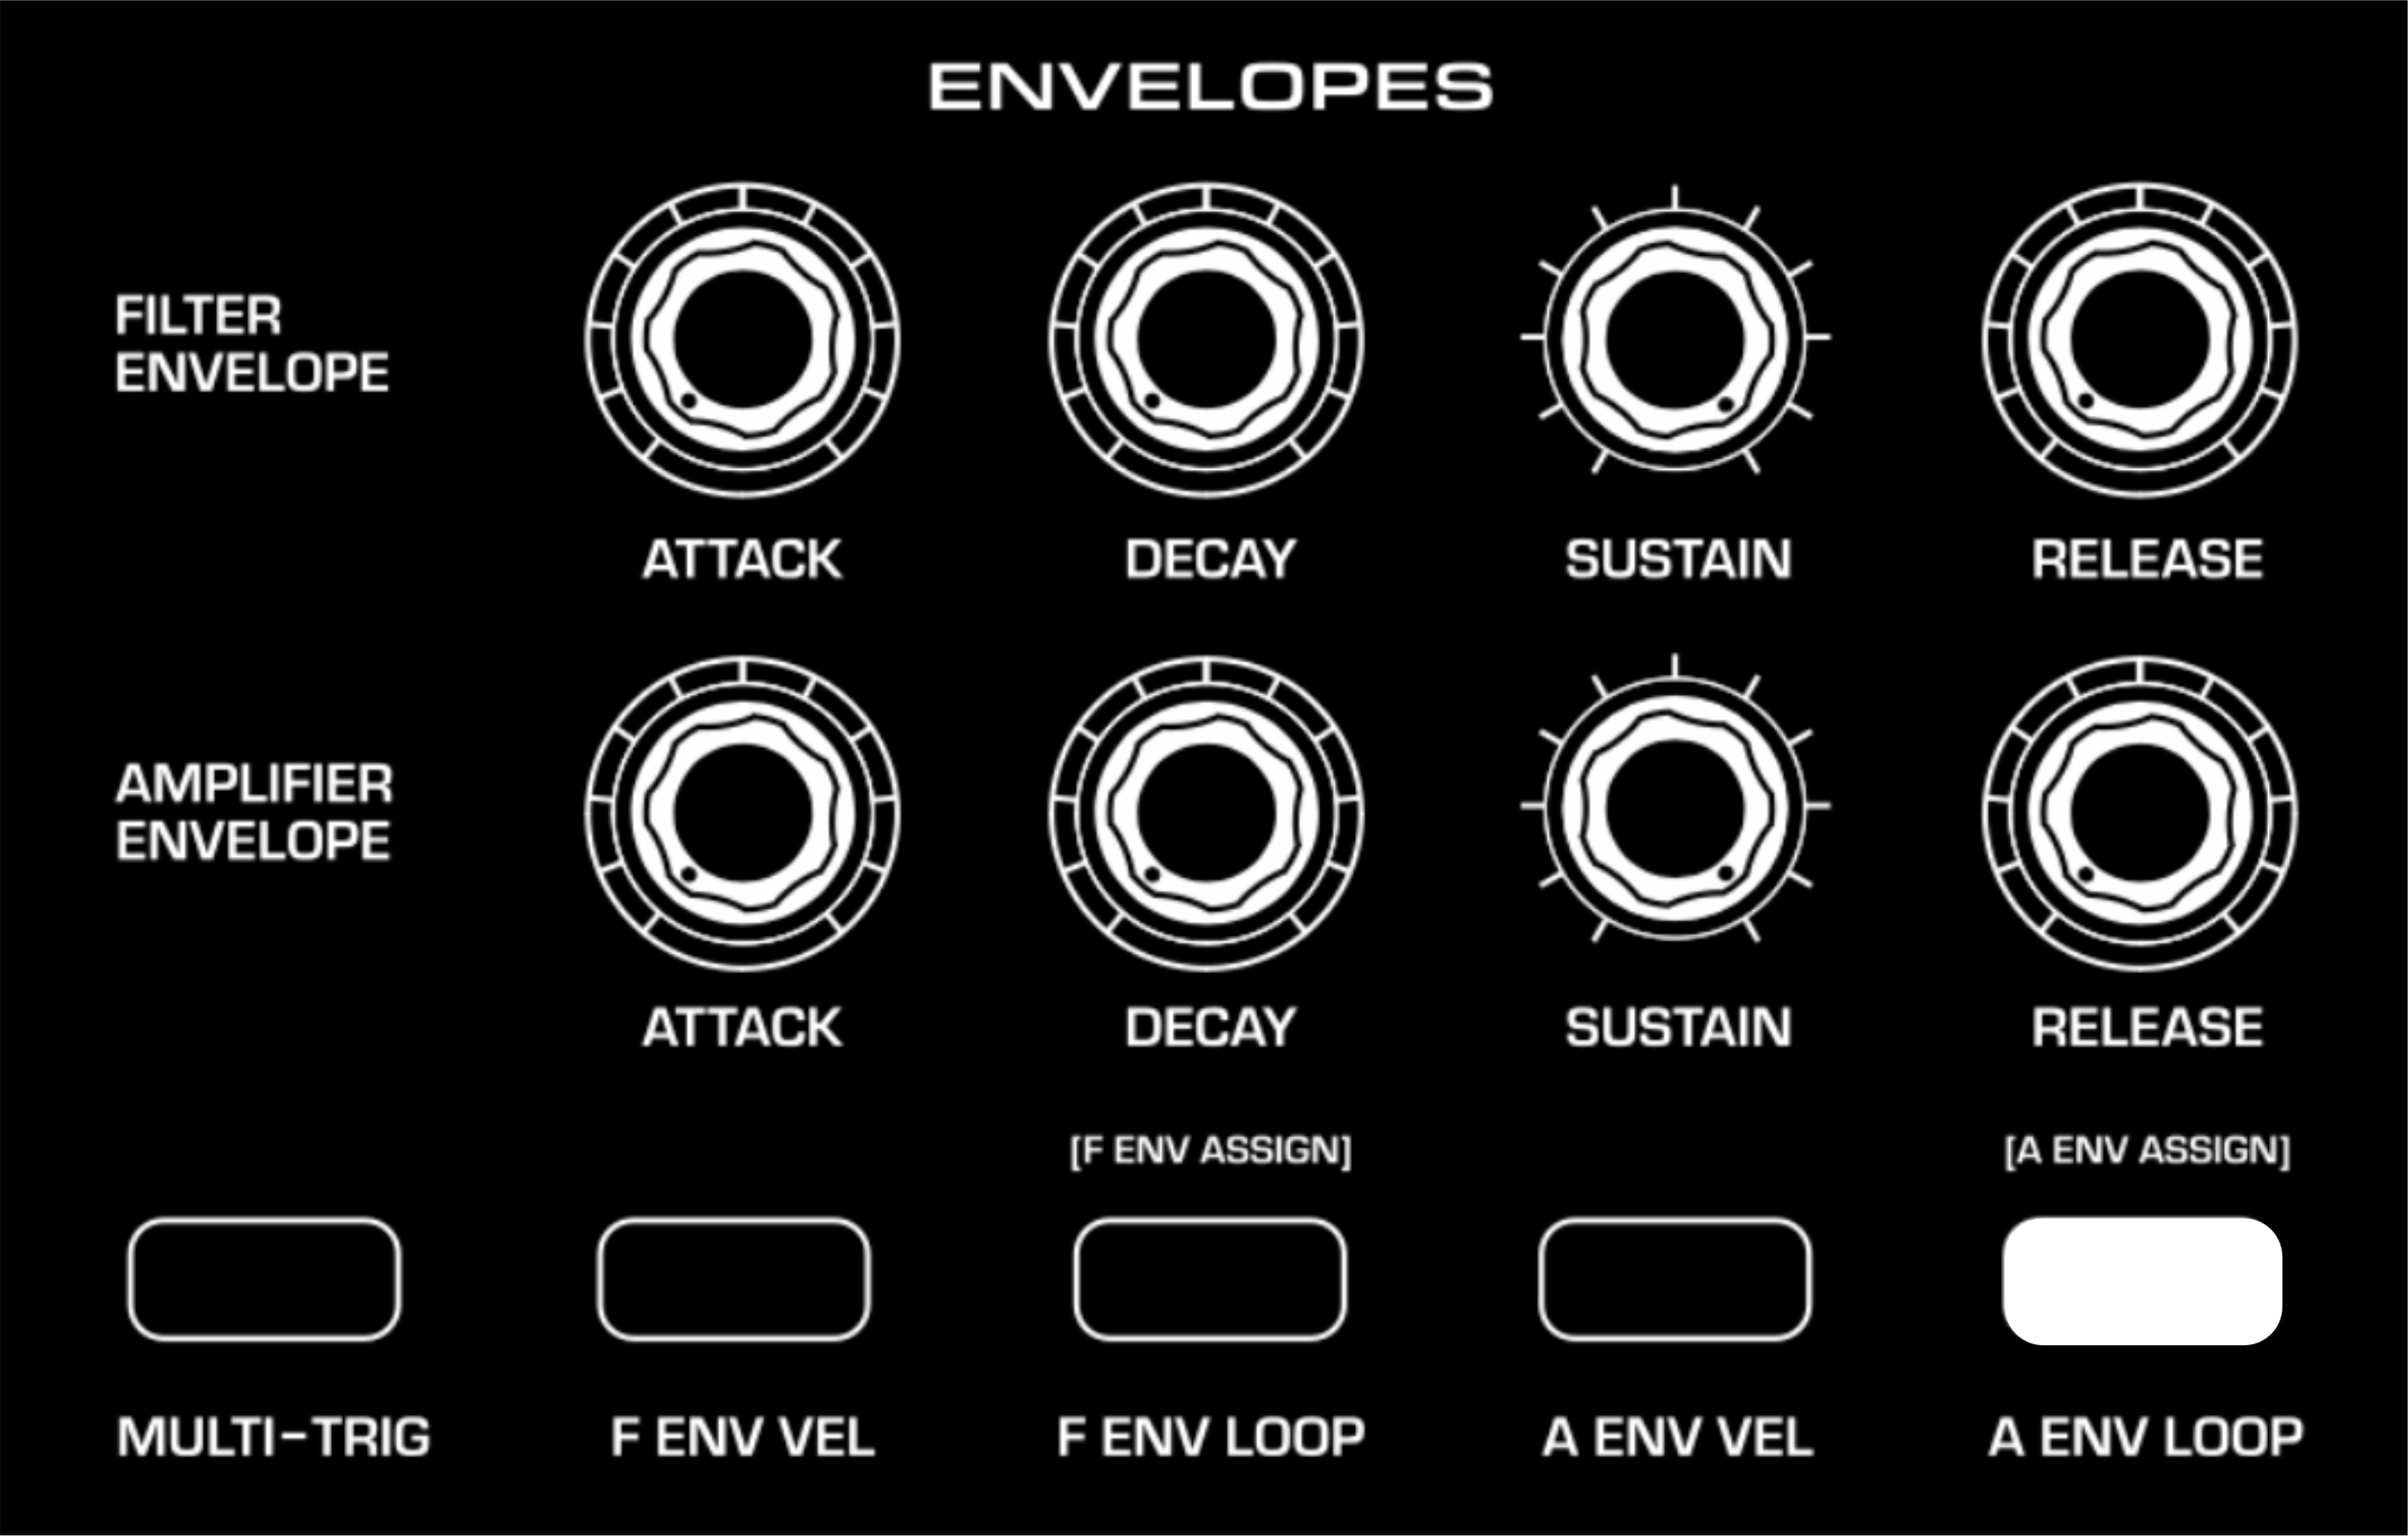
Filter Envelope (F ENV AMT)
This ADSR section is a unipolar control that is internally patched to manipulate the filter CUTOFF FREQUENCY, dependent on the polarity of the EG AMOUNT knob. The custom assignment will be modulated by the FILTER ADSR positions. The MULTI-TRIG, ENV VEL & ENV LOOP buttons will also effect the assigned modulation destination. Using the FILTER instead of the AMP envelope avoids sacrificing the shape of the note for use as another modulation purpose. The AMP envelope can be used for it's intended function to produce clear notes whilst the FILTER modulates anything it chooses.
Try sending this to MOD AMOUNT to creatively apply 1>2 FM. This could make the frequency modulation more of a subtle effect rather than a dominating tonal shift.
- Hold F ENV LOOP (F ENV ASSIGN) for 2 seconds to assign the FILTER ENVELOPE to another custom destination.
- Twist the knob of your chosen destination to change the depth either positively or negatively.
- Press F ENV LOOP (F ENV ASSIGN) to save your settings.
- EG AMOUNT will only control the depth of the FILTER ENVELOPE, assigned to the VCF CUTOFF FREQ. To change the depth of the custom assignment - repeat the previous steps.
- The filter envelope will also effect the filter if a custom assignment is added.
- Only one custom F ENV modulation routing may be programmed this way per patch.
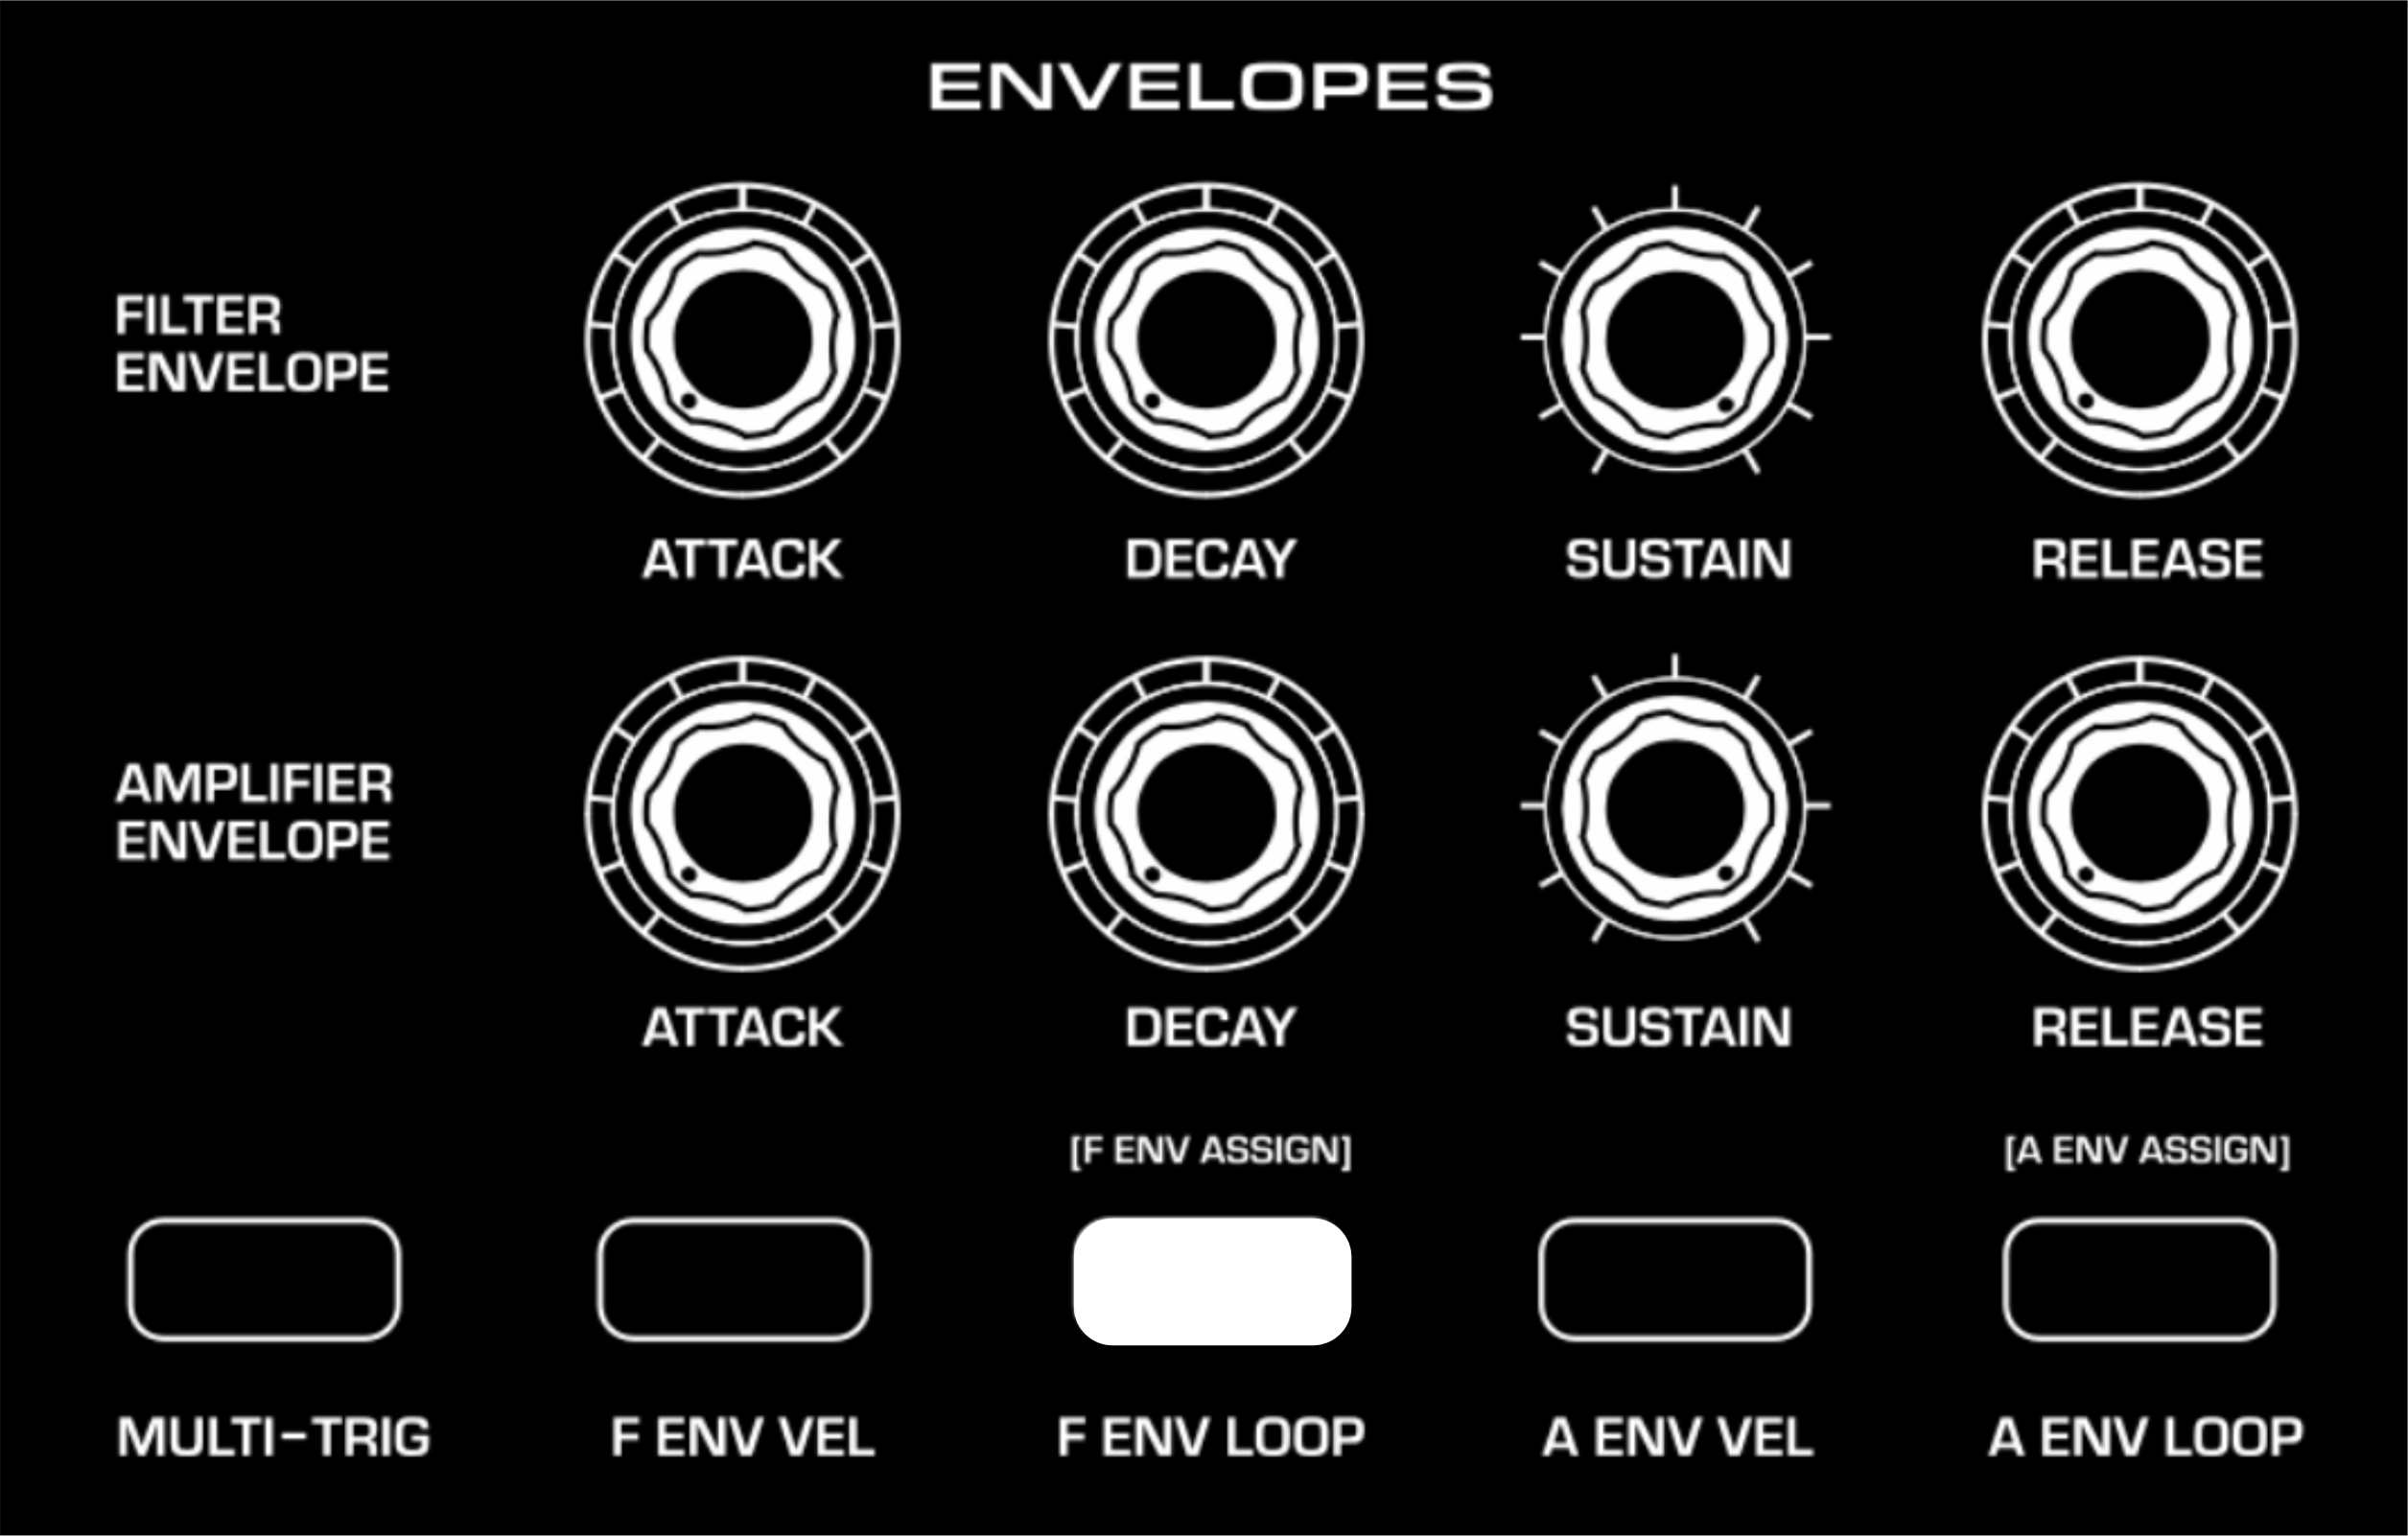
Amp Envelope (A ENV AMT)
This ADSR section is a unipolar control that is internally patched to manipulate the VCA - shaping the notes that are produced. The custom assignment will be modulated by the AMPLIFIER ADSR positions. The MULTI-TRIG, ENV VEL & ENV LOOP buttons will also effect the assigned modulation destination.
Try assigning this to OSC 1 WAVESHAPE, and then set MOD AMOUNT DESTINATION to F ENV > OSC 2 WAVE. Now, you will have two different envelopes modulating both oscillator's waveshapes for an intricate soundscape.
- Hold A ENV LOOP (A ENV ASSIGN) for 2 seconds to assign the AMPLIFIER ENVELOPE to another custom destination.
- Twist the knob of your chosen destination to change the depth either positively or negatively.
- Press A ENV LOOP (A ENV ASSIGN) to save your settings.
- To change the depth of the custom assignment - repeat the previous steps.
- The amp envelope will still also effect the amplifier if a custom assignment is added.
- Only one custom A ENV modulation routing may be programmed this way per patch.
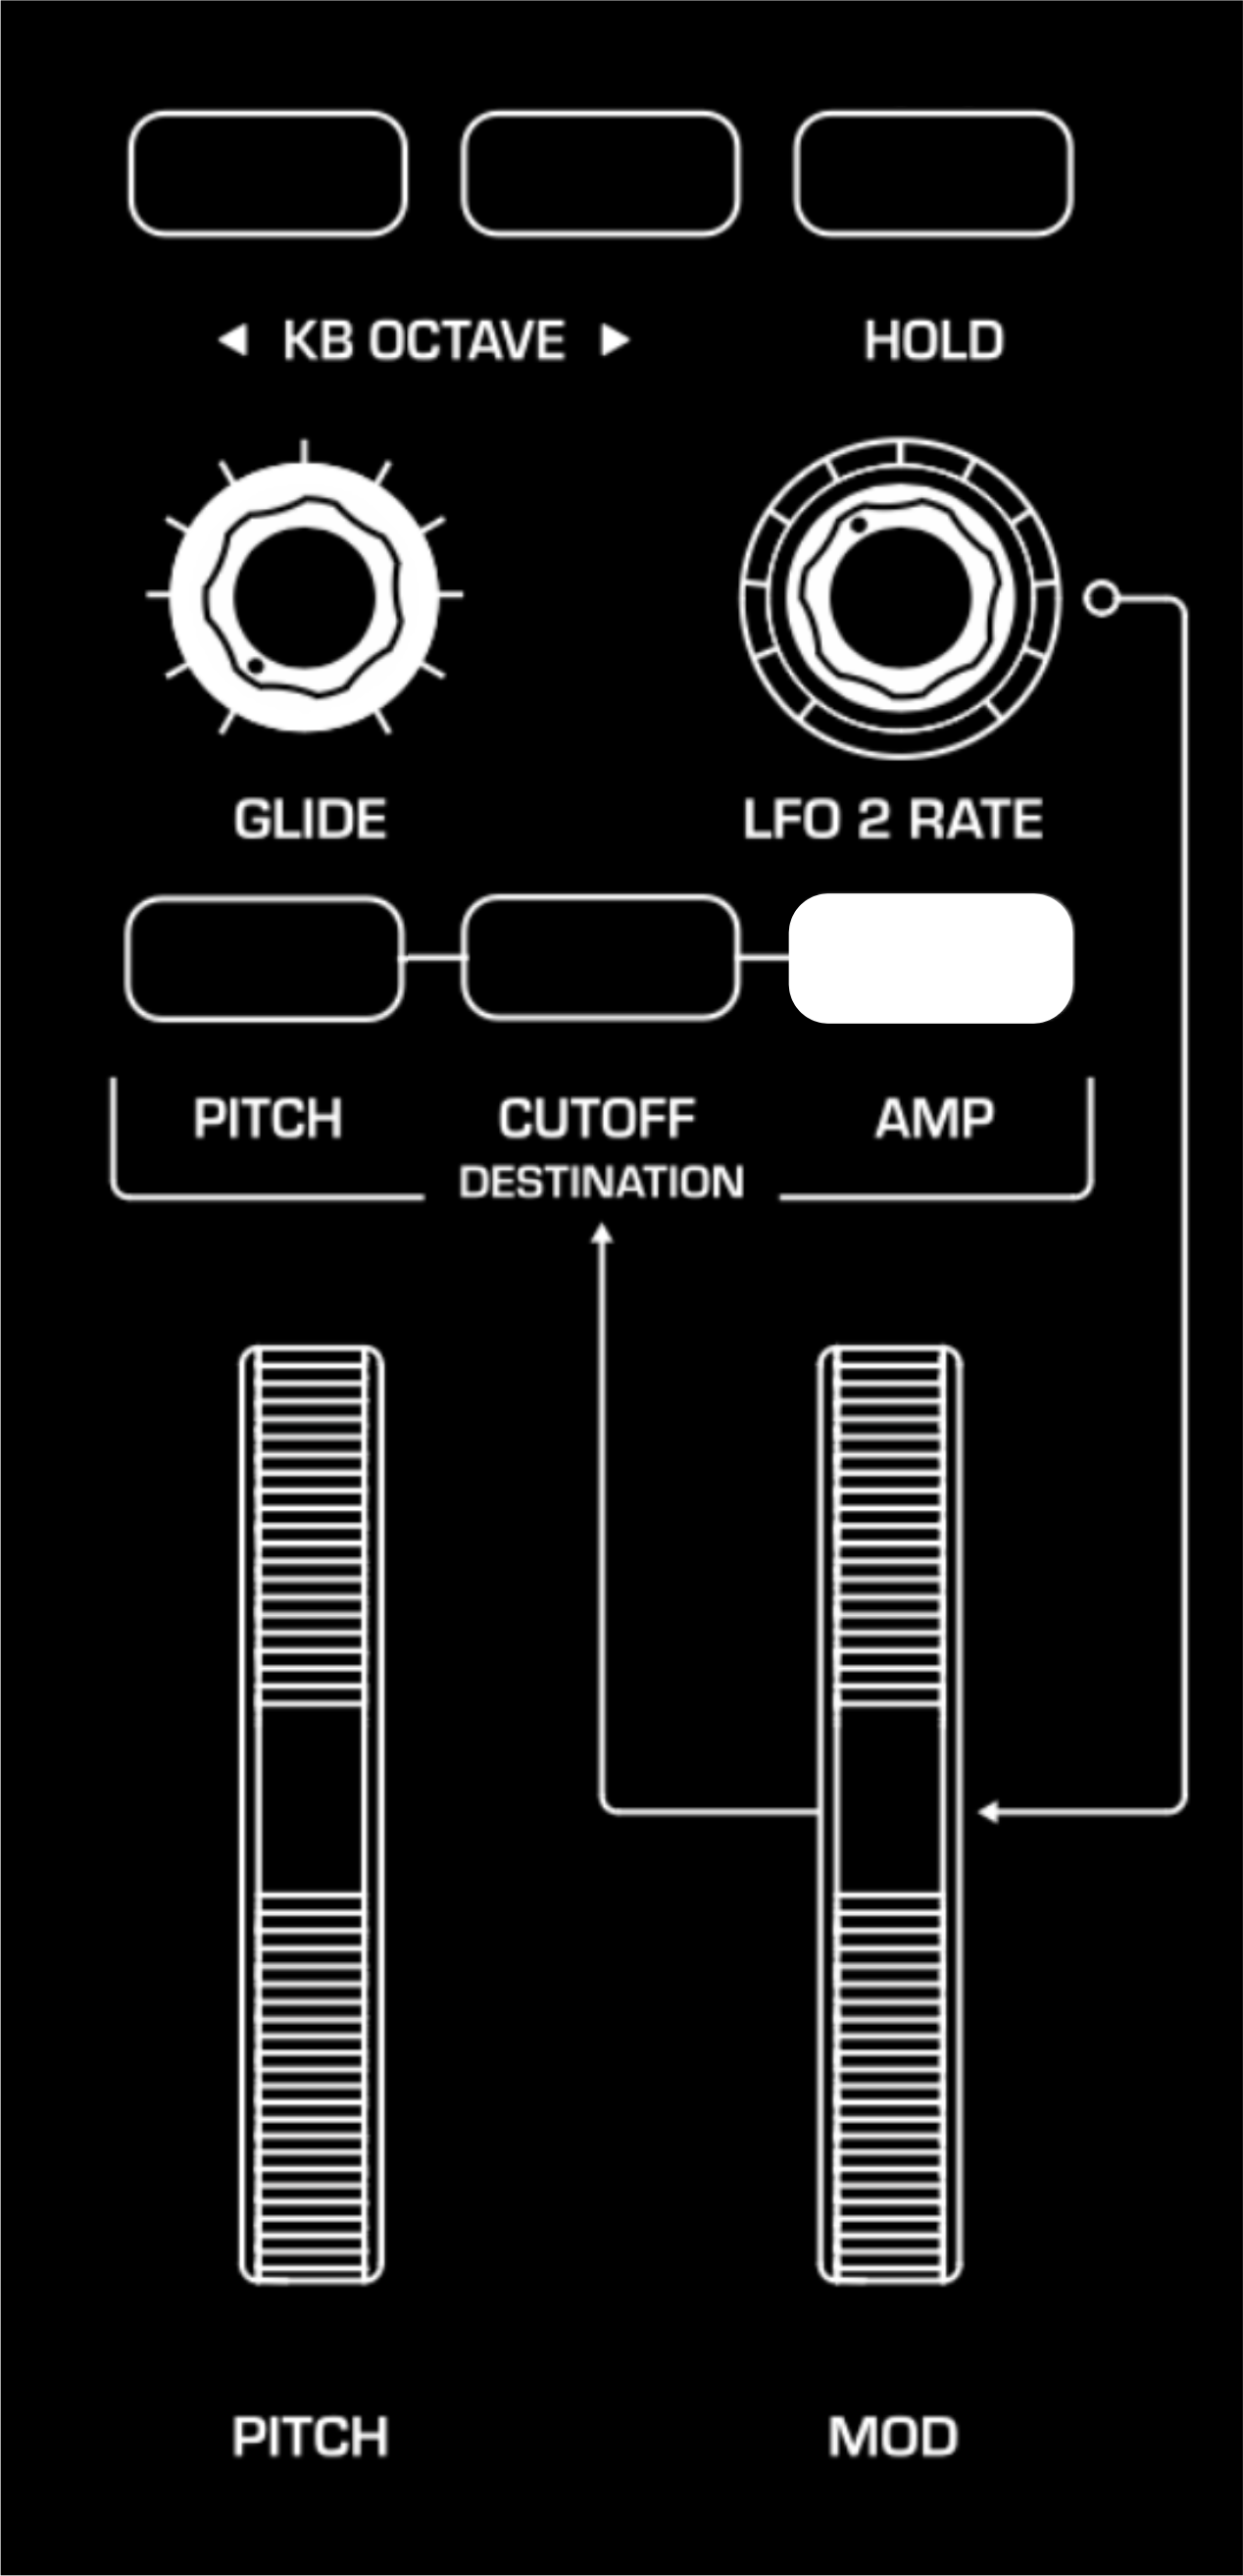
Modulation Wheel (MOD WHEEL AMT)
This feature was introduced in FW 1.1.0. Ensure you have this firmware or later installed into the synth. As this was introduced after production, there is no "ASSIGN" text on the front panel UI.
You can download the latest firmware update HERE.
Initially, the MOD WHEEL controls the depth of modulation from LFO 2 applied to the destination. Using MOD WHEEL AMT does not feed an alternative destination through the LFO. Instead it turns the MOD WHEEL into a level control for the assigned custom destination.
Try applying this to NOISE with a slight positive depth, then turn off NOISE in the mixer. Now, when you use the mod wheel, it will apply a little bit of noise to the signal. Then, you can assign PITCH, CUTOFF or AMP to LFO 2 RATE to have a noise driven modulation effect.
- Hold AMP for 2 seconds to assign the MOD WHEEL to another custom destination.
- Twist the knob of your chosen destination to change the depth either positively or negatively.
- Press AMP to save your settings.
- To change the depth of the custom assignment, repeat the previous steps.
- The mod wheel will still also effect any of the three button-assigned destinations if a custom assignment is added - dependent on which button is activated.
- Only one custom MOD WHEEL modulation routing may be programmed this way per patch.
Keyboard Sample & Hold (KB S+H AMT)
This modulation source generates a new bipolar random value with every key press.
Try assigning this to OSC 1 TUNE to create a random step sequencer. This will change the note of OSC 1, SUB OSC & OSC 2 with every key press.
- Press SETTINGS, then PGM 11 to assign the KB S&H to a destination.
- Twist the knob of your chosen destination to change the depth either positively or negatively.
- Press SETTINGS to save your settings.
- To change the depth of the custom assignment - repeat the previous steps.
- This modulator is not initially pre-routed within the signal flow.
- Only one KB S+H modulation routing may be programmed this way per patch.

Velocity (VEL AMT)
This modulation source will produce a modulation value dependent on how hard you press a key. Both the FILTER & AMP ENVELOPE have a velocity setting, so this can act as another assignable modulator.
Try assigning this the FB to saturate the note the harder you press it.
- Press SETTINGS, then PGM 12 to assign the VELOCITY to a destination.
- Twist the knob of your chosen destination to change the depth either positively or negatively.
- Press SETTINGS to save your settings.
- To change the depth of the custom assignment - repeat the previous steps.
- This modulator is not initially pre-routed within the signal flow.
- Only one VELOCITY modulation routing may be programmed this way per patch.

Aftertouch (AT AMT)
This modulation source will be activated if you push a key past it's fully depressed state. The modulation will then vary past that point.
Try assigning this to the CUTOFF FREQ to open the filter. You will then be able to move this knob without moving your hands away from the keyboard. This is very useful if you are using other outboard gear at the same time and plan to play the Messenger with one hand.
- Press SETTINGS, then PGM 13 to assign the AFTERTOUCH to a destination.
- Twist the knob of your chosen destination to change the depth either positively or negatively.
- Press SETTINGS to save your settings.
- To change the depth of the custom assignment - repeat the previous steps.
- This modulator is not initially pre-routed within the signal flow.
- Only one AFTERTOUCH modulation routing may be programmed this way per patch.

Expression Pedal (EXP AMT)
This modulation source requires an expression pedal inputted into the 1/4 inch jack insert at the back of the synth labelled EXPRESSION.
Try routing this to LFO 1 DEPTH to apply your LFO without needing to touch the depth control.
- Press SETTINGS, then PGM 14 to assign the EXPRESSION PEDAL to a destination.
- Twist the knob of your chosen destination to change the depth either positively or negatively.
- Press SETTINGS to save your settings.
- To change the depth of the custom assignment - repeat the previous steps.
- This modulator is not initially pre-routed within the signal flow.
- Only one EXPRESSION PEDAL modulation routing may be programmed this way per patch.

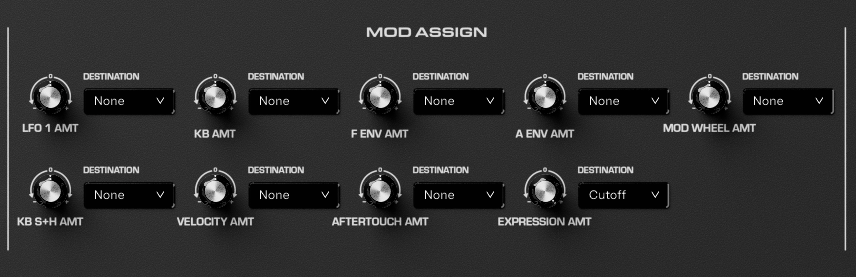
Using The Editor
The editor was introduced on FW 1.1.0. Ensure your synth is updated to this firmware, or later in order to use the editor.
You can download the editor & the latest firmware update HERE.
So far we have been focusing on the standalone synth to patch in these alterative assignments. You can use the editor to quickly change the assignments. Use a PC or Mac to control it via USB.
You can find all of the modulation assignments previously discussed on the Messenger Editor application under MOD ASSIGN.
Was this article helpful?
That’s Great!
Thank you for your feedback
Sorry! We couldn't be helpful
Thank you for your feedback
Feedback sent
We appreciate your effort and will try to fix the article