Native Instruments | Using MIDI Learn to Control Guitar Rig in Pro Tools
In this article, we explain how to control the Guitar Rig plug-in via MIDI-Learn in Pro Tools. This is useful when you need to move or adjust Guitar Rig parameters during a performance and while recording.
The Guitar Rig FX plug-in can be inserted into Pro Tools on both Audio and Instrument Tracks. Follow this guide to learn how to control Guitar Rig in either scenario (or both!).
First Steps: Setup Before Proceeding
Please ensure that all MIDI controllers and pedals are connected and recognized by your computer before proceeding with this guide. This general checklist should help to ensure your devices are set up correctly.
- Quit all Audio Apps on the computer.
- Connect your MIDI keyboard controller to the computer via USB. If using a MIDI keyboard without USB, connect the traditional 5-pin DIN cables to the MIDI In & Out ports of your computer's MIDI interface.
- If using an Expression Foot Pedal and/or MIDI Foot Switch, please be sure these are connected to the proper Footswitch / Footpedal connectors on your MIDI Keyboard / Controller.
- Important: If using pedals with a Komplete Kontrol Series Keyboard, ensure the sustain is configured.
- You can verify that the MIDI Control Signals are recognized by your computer with free tools available online, such as MIDI Monitor for macOS or MIDI OX for Windows.
Please see the documentation for your MIDI Controller devices if more setup assistance is needed.
Controlling Guitar Rig on Audio Tracks vs. Instrument Tracks
Click to expand the section below that applies to you, as the setup procedures for Audio and Instrument tracks in Pro Tools vary.
I'm using Guitar Rig on a Pro Tools Audio Track
Follow this chapter if using Guitar Rig on a Pro Tools Audio Track with a Guitar, Bass, or other Keyboard / Synthesizer. Here, we describe how to route CC control from your MIDI controller or Footpedal to the Guitar Rig FX plug-in loaded on a Pro Tools Audio Track.
Note: For orientation, we recommend following these steps in a new Pro Tools project.
Controlling Guitar Rig Knobs
- Create two new Pro Tools Tracks; One Audio track and another for MIDI.

Note: Create a MONO Audio Track if connecting a Guitar, or create a STEREO Audio Track if connecting a Stereo output instrument, such as a Stereo Synthesizer or Drum Machine. - Connect your Guitar, Bass, or other Instrument to your Audio Interface and ensure that the Track Input Monitor on the Audio Track is active and you can hear the dry signal.

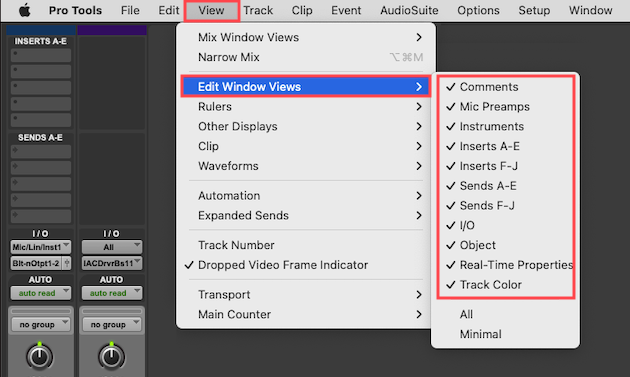
- On the Pro Tools taskbar, click View > Edit Window Views and tick all of the boxes. This shows all Track features that will be used in this guide.

- Also on the Pro Tools taskbar, click Setup > MIDI > MIDI Input Devices and tick the box next to your MIDI controller or interface (if needed).

- On the Audio Track, insert Guitar Rig as an FX plug-in.

Note: Please see this article for more info on loading NI plug-ins in Pro Tools.
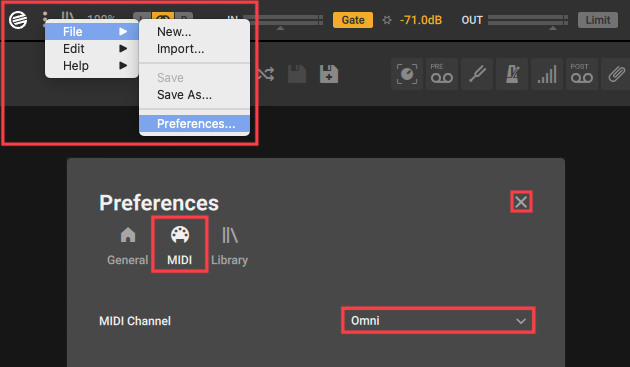
- Open the Guitar Rig plug-in window and go to File > Preferences > MIDI. Make sure the MIDI Channel is set to "Omni", and close the Guitar Rig Preferences once this is confirmed.
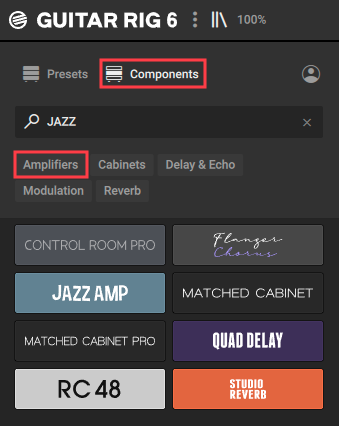
- In the Guitar Rig Browser, choose an Amp, Effect Rack, or Preset. In this example, we will load the PRO FILTER effect from the Components > Filters category.

- On the Pro Tools MIDI Track, go to I/O (column) > MIDI Input Selector and select All to enable your MIDI Controller or MIDI Foot Pedal.

- On the same Pro Tools MIDI Track and I/O column, choose MIDI Output Selector > Audio 1 - Guitar Rig 6 MIDI In 1 > channel-1.

- Record-enable both the Audio and MIDI tracks by holding SHIFT and clicking the red buttons on both tracks.

- Back in the Guitar Rig plug-in window, right-click (or CTRL+Click) a Guitar Rig effect parameter and select Learn MIDI Control.

- While in Learn MIDI Control mode, move the Foot Pedal or Knob / Slider on your MIDI Controller and the selected Guitar Rig parameter will start to move accordingly. In this example, we will MIDI-Learn the PRO FILTERFreq(cutoff) knob.
Note: If not using a MIDI Foot Pedal you can use any Knob, Slider, or Ribbon on your MIDI Controller.
While playing your instrument, you should now hear the PRO FILTER cutoff frequency affecting the instrument's audio signal while moving your MIDI foot pedal or controller knob.
Controlling Guitar Rig Buttons
If you wish to control button parameters in Guitar Rig such as the Rack Device's On / Off switch, or MACRO buttons, simply repeat steps 11-12 above, but use a MIDI controller button or MIDI footswitch.
If a software toggle button or switch in Guitar Rig requires two presses from your controller, you will need to right-click (or CTRL+Click) the Guitar Rig button parameter and select Enable Hold Mode.

I'm using Guitar Rig on a Pro Tools Instrument Track
Follow this chapter if using Guitar Rig on a Pro Tools Instrument Track to process the sound from a software instrument (a.k.a. "soft synth"). Here, we describe how to route CC control from your MIDI controller or Footpedal to the Guitar Rig FX plug-in loaded on a Pro Tools Instrument Track.
Note: For orientation, we recommend following these steps in a new Pro Tools project.
Controlling Guitar Rig Knobs
- Create two new Pro Tools Tracks; One Stereo Instrument Track and another for MIDI.

- On the Pro Tools taskbar, click View > Edit Window Views and tick all of the boxes. This shows all Track features that will be used in this guide.
- Also on the Pro Tools taskbar, click Setup > MIDI > MIDI Input Devices and tick the box next to your MIDI controller or interface if needed.

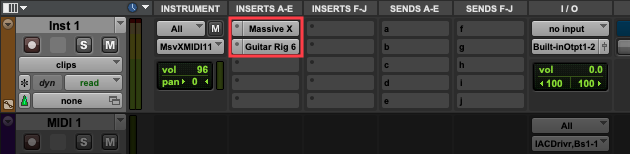
- On the Instrument Track, load a Software Instrument (or "soft synth") plug-in. In this example, we will load Massive X.
- On the same Instrument Track, insert Guitar Rig as an FX plug-in (i.e. insert it after Massive X).
- Open the Guitar Rig plug-in window and go to File > Preferences > MIDI. Make sure the MIDI Channel is set to "Omni", and close the Guitar Rig Preferences once this is confirmed.

- In the Guitar Rig Browser, choose an Amp, Effect Rack, or Preset. In this example, we will load the JAZZ AMP from the Components > Amplifiers category.
- On the Pro Tools Instrument Track, go to Instrument (column) > MIDI Input Selector and select All to enable your MIDI Controller (keyboard).

- On the same Pro Tools Instrument Track and Instrument column, choose MIDI Output Selector > Inst 1 > Massive X MIDI In 1 > channel-1. This allows your software instrument to receive Note Input from your MIDI keyboard.
Note: Massive X is used as an example. At this step, choose the path leading to the first MIDI Channel of your Instrument Plug-In (or "soft synth").

- On the Pro Tools MIDI Track, go to I/O (column) > MIDI Input Selector and select All to enable your MIDI Controller or MIDI Foot Pedal.

- On the same Pro Tools MIDI Track and I/O column, choose MIDI Output Selector > Inst 1 > Guitar Rig 6 MIDI In 1 > channel-1.

- Record-enable both the Instrument and MIDI tracks by holding SHIFT and clicking the red buttons on both tracks.

- Back in the Guitar Rig plug-in window, right-click (or CTRL+Click) a Guitar Rig effect parameter and select Learn MIDI Control.

- While in Learn MIDI Control mode, move the Foot Pedal or Knob / Slider on your MIDI Controller, and the selected Guitar Rig parameter will start to move accordingly. In this example, we will MIDI-Learn the Mic Distance (A / B Air Balance) slider in the JAZZ AMPCabinet.
Note: If not using a MIDI Foot Pedal you can use any Knob, Slider, or Ribbon on your MIDI Controller.
While playing your software instrument plug-in (e.g. Massive X), you should now hear the JAZZ AMP Mic Distance (Air Balance) affecting the instrument's audio signal while moving your MIDI foot pedal or controller knob.
Controlling Guitar Rig Buttons
If you wish to control button parameters in Guitar Rig such as the Rack Device's On / Off switch, or MACRO buttons, simply repeat steps 13-14 above, but use a MIDI controller button or MIDI footswitch.
If a software toggle button or switch in Guitar Rig requires two presses from your controller, you will need to right-click (or CTRL+Click) the Guitar Rig button parameter and select Enable Hold Mode.

Controlling Multiple Guitar Rig Instances Simultaneously
In this chapter, we will further explain how to apply MIDI control if you have inserted more than one instance of Guitar Rig in your Pro Tools project. The info in this section will require that you have already followed the steps provided in the Audio Track or Instrument Track chapters above.
Controlling Multiple Guitar Rig Instances Within One Track
If using multiple instances of Guitar Rig in a single track (e.g. using two or more Guitar Rig presets in series), you can assign additional MIDI tracks to control each instance of Guitar Rig. Follow the Audio or Instrument Track chapters above, but create extra MIDI tracks as needed.
You can record-enable all of the tracks containing Guitar Rig by holding SHIFT and clicking the red buttons for each Pro Tools track. The assigned MIDI Control will affect all Guitar Rig instances on these active tracks.
Controlling Multiple Guitar Rig Instances Over Separate Tracks
If using multiple instances of Guitar Rig on separate tracks (e.g. if using more than one "soft synth"), you can assign additional MIDI tracks to control each instance of Guitar Rig. Follow the Audio or Instrument Track chapters above, but create extra Instrument and MIDI tracks as needed.
You can record-enable all of the tracks containing Guitar Rig by holding SHIFT and clicking the red buttons for each Pro Tools track. The assigned MIDI Control will affect all Guitar Rig instances on these active tracks.
Switching Guitar Rig Presets via MIDI Learn
You can assign MIDI Control to automate the Previous Preset (Up Arrow) and Next Preset (Down Arrow) tabs above the Guitar Rig Rack area.
- Right-click (or CTRL+Click) the Previous Preset (Up Arrow) tab and select Learn MIDI Control.

- Press a button or switch on your MIDI Controller device.
- Repeat steps 1-2 above, to assign the Next Preset (Down Arrow) tab to another button or switch on your MIDI Controller device.
Important: If controlling multiple instances of Guitar Rig across separate tracks as described in the previous section, you will need to assign a separate pair of MIDI CC numbers to each set of Previous / Next Preset tabs on each instance of Guitar Rig.
Was this article helpful?
That’s Great!
Thank you for your feedback
Sorry! We couldn't be helpful
Thank you for your feedback
Feedback sent
We appreciate your effort and will try to fix the article