
TABLE OF CONTENTS
- I'm having trouble registering my MPC One G2
- Why isn't my MPC One G2 recognized by my computer?
- Why is my MPC One G2 lagging or freezing?
- Why does my MPC One G2 display "Looking For Computer"?
- How do I record over USB into my MPC One G2's Sampler?
- Troubleshooting the USB-C hardware settings
- What Operating Systems are compatible with the MPC One G2?
- Are the new MPC One G2 features available on MPC 3.9 Desktop?
- How do I bus out my tracks from MPC One G2 into a DAW?
- How do I access the new Super algorithm?
- How do I access and edit Q-Links from the new Pull-Down Menu?
- How can I layer drum samples together?
- How do I make a kit that takes advantage of articulations without MPCe pads?
- Will my MIDI controller work with the MPC One G2 standalone?
- How do I use the new Time Signature feature for MPC 3.9 sequences?
- How do I use the new Time Signature feature for MPC 3.9 clips?
- How do time signatures work when being put together in MPC 3.9?
- I can't use MPC 3.9 Plugin in my DAW
I'm having trouble registering my MPC One G2
When registering your MPC One (G2), please ensure that you provide the complete 15-digit serial number, including any letters that may be present. Input the date and location of your purchase and you should be good to go! Please see the guide below for reference, if you have trouble.
If you experience repeated error messages, be sure to note down exactly which error message you're receiving and reach out to our support team here.
Why isn't my MPC One G2 recognized by my computer?
The most important thing to verify when troubleshooting connectivity issues with your computer is the driver and firmware version currently installed on your system. The firmware version on your device must match the software versions currently installed on your computer. You can find your MPC Firmware and Drivers bundled into your inMusic Software Center located in your Akai Pro account.
If you have confirmed that your MPC software and firmware versions are the same and that your drivers are installed correctly, there are still troubleshooting steps that can be performed! At its core, the MPC's controller mode is a MIDI controller. We have several troubleshooting guides for MIDI controllers, which are linked below:
We highly suggest installing the driver before you attempt any connection to your computer.
Why is my MPC One G2 lagging or freezing?
Some of the new plugins and instruments on the MPC One G2 are very system intensive, as they are some of the most powerful and complex tools ever included with an MPC. It is important when creating on the MPC One G2 in standalone mode to keep an eye on your System Resources, which can give you insight into how or why your unit is slowing down during use. If you begin to experience lag or freezing on your unit, try navigating to the System Resources panel of your MPC by clicking either the battery or system resource bars available from the Main Mode menu of the MPC. A screen should pull up that looks like the one below.

The indicators in this window show current usage statistics:
- CPU: The CPU indicator shows the current CPU as a percentage. If this indicator shows that you are nearing full capacity, you may begin to experience some freezing. Try disabling any unnecessary plugins or effects when not using those tracks!
- RAM Usage: The Mem indicator shows your MPC hardware’s current RAM usage. You should make sure to set a Temporary File Location to an external memory drive using Preferences>Project Load/Save>Temporary File Location to help load samples directly off an SD card or Drive instead of using the internal RAM.
- Drives: The Drives indicator shows the available storage space on any detected external storage devices or the internal drive of the MPC One G2.
If these resources all check out, there may be something else causing your unit to experience lag.
Why does my MPC One G2 display "Looking For Computer"?
- The MPC Desktop software is on the same version as your MPC One's firmware version.
- The MPC One driver has been installed.
- The MPC Desktop software is running.
- You are connecting to the computer via the MPC's USB-C port.
If you have confirmed all of three of the above and the MPC still says looking for computer, please refer to
the 'MPC One G2 isn't recognized by my computer' section above.
How do I record over USB into my MPC One G2's Sampler?
To set up the Sampler before recording:
1. Make sure to reduce the volume levels of your audio source and speakers, headphones, and/or monitors before you make any connections to avoid “pops” or feedback.
2. Connect your computer via the USB-C port.
3. Set the Input ___ menu in the upper-left corner to the input(s) where you connected your source as USB Input 1,2.
4. Return to the Sampler Mode Screen, and when you play audio from your source, you should now see the level in the meter. Make sure it does not exceed the maximum level (the meter should not be “peaking” constantly).
5. Set the recording controls as desired.
6. Tap the Arm button to record-arm the Sampler.
For more on recording via USB-C, please see our video guide here:
Troubleshooting the USB-C hardware settings
Please note the following important details when connecting a USB-C device to the MPC One G2.
The MPC One G2 has a dedicated USB menu to configure how it will treat connected USB-C devices. This can be found in Menu > Preferences > Hardware > USB

USB Type-C Power Role
USB Type-C Data Role
- Act as Device: The MPC standalone MIDI ports and audio device are forwarded to and useable on the connected device.
- Act as Host: The MPC can host and manage features of a connected device, such as its MIDI ports, file storage, or audio device.
Important Notes:
- When a USB-C device is connected to the MPC's USB-C port, you will be able to select the above USB-C power/data role options.
- If a USB-C cable alone is connected to the MPC's USB port, you will not be able to select the above USB-C power/data role options.
- If nothing is connected to the MPC's USB-C port, you will not be able to select the above USB-C power/data role options.
- If you are using a smartphone, ensure it is set to Act as Device
If you continue to experience issues - this may be due to the following reasons:
- The USB-C cable you are using is a charging only cable, Ensure you are using a cable that supports data transfer.
- The USB-C cable is faulty/damaged - try with a good/known working cable instead.
What Operating Systems are compatible with the MPC One G2?
All controller mode functions with the MPC One G2 will require the following:
- Windows 10 or 11.
- Mac OS 14, 15 and 26
In addition, MPC 3.6 will be the minimum MPC software that can be used with MPC One G2, which carries the same requirements.
Are the new MPC One G2 features available on MPC 3.9 Desktop?
Yes, every feature that you can control on the MPC One G2 will also be available within MPC 3.9 for a seamless transition between your projects on the full DAW setup for an uninterrupted workflow.
How do I bus out my tracks from MPC One G2 into a DAW?
When selected as a DAW's Audio interface, MPC One G2 will show a range of stereo outputs that will correspond to the inputs on your computer. Select the input that matches the MPC One G2's output, and you will be able to record from it. Please note, these 24 outputs are digital for track separation, and cannot be split via the audio outputs for monitoring purposes within the MPC One G2. For audio track splitting for use with a mixing board for up to 32 tracks, please see external interfaces in the user guide.
Note: Increasing the number of simultaneous inputs and outputs will also increase CPU overhead.
How do I access the new Super algorithm?
After purchasing the MPC Pro Pack, the new warp algorithms can be found inside the sample edit mode, towards the bottom of the screen. Use the Algorithm field to set the Warp algorithm for the sample. By default, this will be set to whatever is selected as the Default Audio Warp Algorithm under Menu > Preferences > Audio/Export. Adjusting the setting here will override the default selection. Select Pro Ten, Repitch, or Super. When using Repitch, warping an audio sample will adjust its pitch to synchronize it with the MPC tempo.
How do I access and edit Q-Links from the new Pull-Down Menu?
Q-Link controls can quickly be mapped and edited using the new Pull Down menu function from any of the MPC modes, and navigating to page 2 using the right arrow.
Tap the Current Control field to select the type of control you want to create an assignment for. In the above screenshot, we are editing Q-Link 1.
Tap the Learn button to activate MIDI learning. Once activated, the Q-Link Bank LED on your MPC One G2 will blink.
Navigate to the mode that displays the parameter you would like to learn, and then adjust that parameter. The screen
will show a message, "Learned [parameter] to [macro control]." To lock in the assignment, tap the Learn button again.
Tap the Momentary button to turn momentary behavior on or off. When on, moving the knob will adjust its parameter, but the parameter will immediately return to its original position (when you turned Momentary on) when you release the knob.
When off, moving the knob will adjust its parameter, and the parameter will remain at its new setting when you release the knob.
Tap the arrow next to the Momentary to adjust additional settings for when the macro control is released:
To revert the macro parameter(s) to their minimum value on release, check the Go to Minimum box.
To revert to the last value state before the macro was changed on release, check the Go to Previous box.
How can I layer drum samples together?
Drum layers can be layered using the sample edit screen, using the new layers column underneath the waveform:
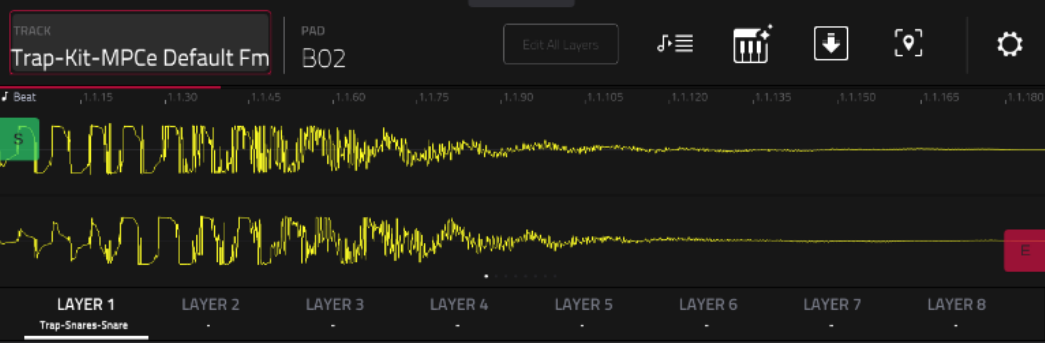
These layers can be edited to have multiple samples applied per pad and how they express together. Tapping the sample button again at the bottom of the screen will allow you to edit different parameters in terms of the way they act when triggered:
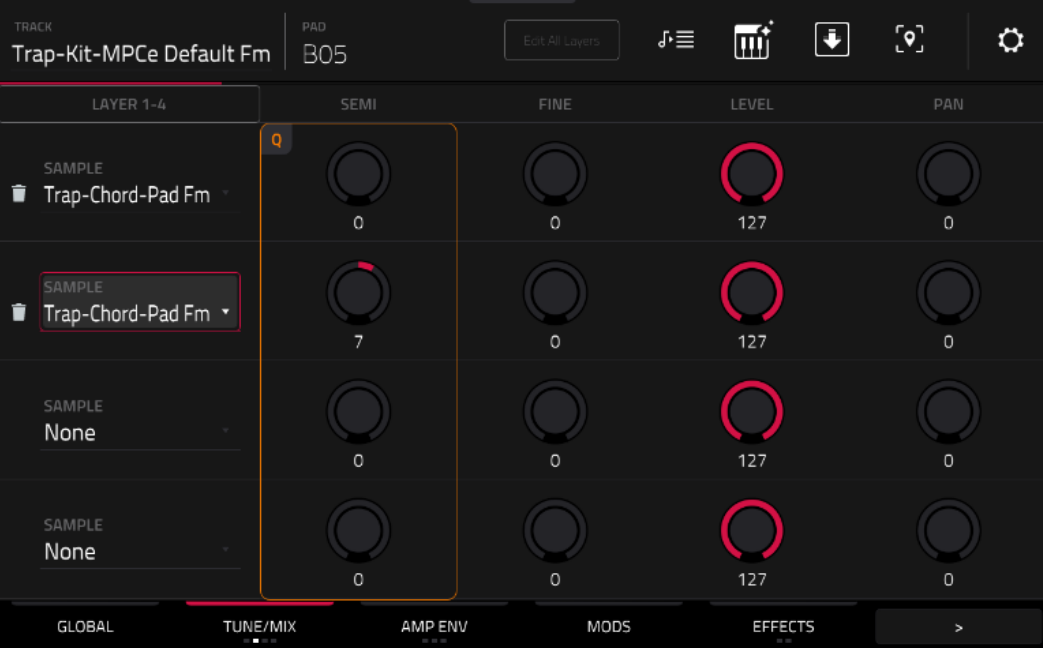
For example, on the TUNE/MIX screen, you can adjust the levels of each layer to adjust how each layer will sound in harmony with each other. For more information on creating new MPCe kits and layering sounds, please see our YouTube guide here: YouTube.
How do I make a kit that takes advantage of articulations without MPCe pads?
To take advantage of the MPC articulations, go into the Menu>Track Edit, then double-tap the effects tab at the bottom of the screen to adjust how the MPC pads will articulate when pressed, and make sure to turn on the MPCe button to the right of the word Articulations before selecting what articulation you would like to use(by default, None will be selected when you make your first kit Double tap the word None to change this). The corresponding numbers will not apply for the MPC One G2, as the pad will play the articulation attached to the 1, or bottom left quadrant.
For more information, please see the following video from our MPC Academy series:
Will my MIDI controller work with the MPC One G2 standalone?
Midi controllers can be connected to the MPC over the USB-A, USB-C and Midi DIN ports. Please note that all controllers must be Class Compliant, and it is advised to use a power supply or powered hub.
How do I use the new Time Signature feature for MPC 3.9 sequences?
From the Main Screen, tap the Time Signature fields to the right of your BPM to adjust the time signature of the project.

The numerator (top/first number) indicates the number of beats per bar (1–16).
The denominator (bottom/second number) indicates the note value of each beat (4, 8, 16, 32). Time signatures can be set individually per sequence.
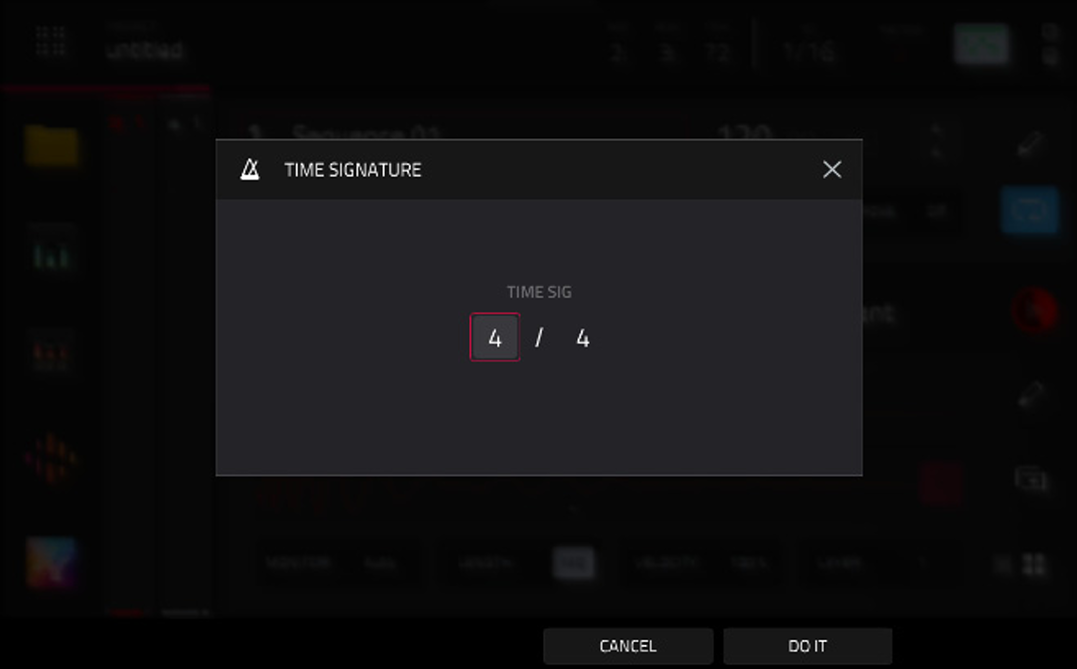
Tap Do It to apply the Time Signature change.
Tap Cancel, the X, or anywhere outside the window to close it.
How do I use the new Time Signature feature for MPC 3.9 clips?
- Scroll to an empty clip slot
- Open the Create Clip overlay
- Set your desired time signature
- Select Create Clip
Editing a Clip’s Time Signature
- Open the Clip Editor
- In the toolbar, adjust the Time Signature field
How do time signatures work when being put together in MPC 3.9?
- Each sequence or clip can only have one time signature
- When chaining sequences in Song Mode and using Convert Song to Sequence, time signature changes are converted into bar/beat/pulse positions rather than preserved as multiple time signatures
- Importing a MIDI file into a sequence or clip should import its time signature.
I can't use MPC 3.9 Plugin in my DAW
- Please make sure during the desktop installation process that you checked off all plugin types.
- Please check with the developer of your DAW that either VST3 or AU plug-ins are supported.
- At launch, AAX is not included with MPC 3.9.
Was this article helpful?
That’s Great!
Thank you for your feedback
Sorry! We couldn't be helpful
Thank you for your feedback
Feedback sent
We appreciate your effort and will try to fix the article