This article explains how to automate the parameter changes of your Native Instruments plug-ins in Cubase.
TABLE OF CONTENTS
- Manually Drawing Automation Curves
- Recording Automation with a Mouse-Cursor
- Recording Automation with a MIDI Controller
Manually Drawing Automation Curves
- Create a Cubase Instrument Track and load a plug-in. In this example, we choose Massive.
Note: Please see this article for more information about inserting NI plug-ins in Cubase.
- Right-click (or CTRL + Click) the instrument track and choose Show Automation from the menu. This will display a sub-track containing automation parameters.

- Open the Volume drop menu and choose More... In the Add Parameter window, expand your plug-in's folder and select the parameter you wish to automate. In our example, we choose Massive > Cutoff. Click OK to confirm.

On the automation track, you will now see that the drop menu contains the plug-in parameter you selected for automation.
- Select the Draw tool from the Cubase header and draw an automation curve into the track.
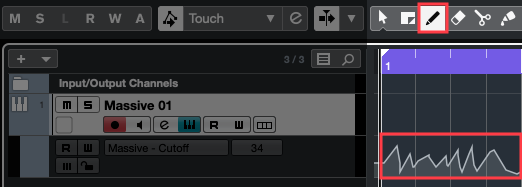
- Activate the R (Read) button to engage playback of the automation curve.

Now when you play the Cubase project, the plug-in parameters will follow the automation curves written on the track.
Recording Automation with a Mouse-Cursor
- Create a Cubase Instrument Track and load a plug-in. In this example, we choose Massive.
Note: Please see this article for more information about inserting NI plug-ins in Cubase.
- Activate the W (Write) button on the Instrument track to enable the automation Write mode.
Note: The R (Read) button will automatically become active as well since it is also required for automation playback.

- Open the plug-in window and find some parameters you would like to automate. In this example, we will adjust the Wavetable Position (Wt-Pos) and Filter Cutoff software knobs in Massive (you can choose any adjustable parameters you like).

- Start Cubase playback and use the mouse cursor to move the parameter knobs on the plug-in window (e.g. Massive Wt-Pos & Filter Cutoff in this example). Since the automation W (Write) button is active, the parameter movements will be recorded while Cubase is playing. Stop Cubase playback once you are finished recording automation.
- Disable the W (Write) automation button so that only the R (Read) button is active, to prevent the writing of any further automation.

- To view the recorded automation curves, right-click (or CTRL + Click) the instrument track and choose Show All Used Automation from the menu. This will show separate sub-tracks for all recorded parameter changes.

Now when you play the Cubase project, the plug-in parameters will follow the automation curves written on the track.
Recording Automation with a MIDI Controller
- Create a Cubase Instrument Track and load a plug-in. In this example, we choose Massive.
Note: Please see this article for more information about inserting NI plug-ins in Cubase.
- Activate the W (Write) button on the Instrument track to enable the automation Write mode.
Note: The R (Read) button will automatically become active as well since it is also required for automation playback.

- Open the plug-in window and assign a parameter to be "MIDI-Learned" by a knob or slider on your MIDI controller. After enabling MIDI Learn in your plug-in, move one knob or slider on your MIDI controller. The plug-in knob you've chosen should start to move as well.

Note: In our example, right-click (or CTRL + Click) a parameter in Massive and select MIDI Learn. This process will vary depending on which plug-in is used.
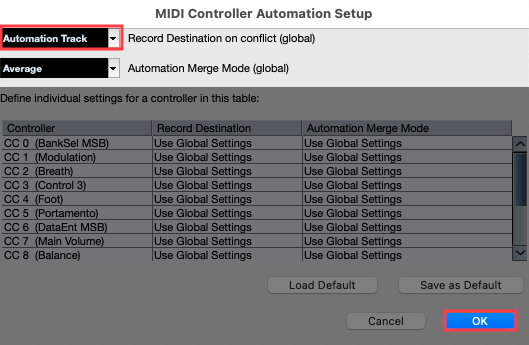
- In the Cubase taskbar, go to: MIDI > CC Automation Setup.

- In the MIDI Controller Automation Setup window, set the Record Destination drop-menu to Automation Track. Click OK to confirm.
- Start Cubase playback and move the assigned ("MIDI-Learned") knobs or sliders on your MIDI controller. Since the automation W (Write) button is active, the parameter movements will be recorded while Cubase is playing. Stop Cubase playback once you are finished recording automation.
- Disable the W (Write) automation button so that only the R (Read) button is active to prevent the writing of any further automation.

- To show the recorded automation curves, right-click (or CTRL + Click) the instrument track and choose Show All Used Automation from the menu. This will show separate sub-tracks for all recorded parameter changes.

Now when you play the Cubase project, the plug-in parameters will follow the automation curves written on the track.
Was this article helpful?
That’s Great!
Thank you for your feedback
Sorry! We couldn't be helpful
Thank you for your feedback
Feedback sent
We appreciate your effort and will try to fix the article